
Imagine never having to worry about blind spots or backing into obstacles again. With a backup camera on your car, you gain a new level of confidence and safety while driving.
You might think installing one is complicated, but it’s easier than you expect. This guide will show you how to put a backup camera on your car, step-by-step. You’ll discover the simple steps that make this upgrade both manageable and rewarding.
Don’t miss out on the chance to enhance your driving experience—keep reading to find out how you can do it yourself!
Benefits Of Installing A Backup Camera
Installing a backup camera enhances safety while reversing. It offers clear visibility of obstacles behind the car, reducing blind spots. This device also facilitates easier parking and prevents potential accidents.
Installing a backup camera offers numerous benefits for drivers. It enhances safety, improves parking, and boosts overall driving confidence. Let’s explore the advantages in more detail.Enhanced Safety
Backup cameras provide a clear view of the area behind your car. They help prevent accidents by alerting you to obstacles. This feature reduces the risk of hitting unseen objects or pedestrians.Improved Parking
Parking can be stressful, especially in tight spaces. A backup camera assists in maneuvering your car with precision. It helps you park smoothly by displaying the distance to nearby objects.Reduced Blind Spots
Blind spots can lead to dangerous situations. Backup cameras minimize these blind spots by offering a wide-angle view. This visibility helps you make safer decisions while reversing.Increased Vehicle Value
Installing a backup camera can add value to your car. Many buyers look for modern safety features. A backup camera can make your car more attractive to potential buyers.Ease Of Use
Backup cameras are easy to use and understand. They display clear images on your dashboard screen. This simplicity helps drivers of all ages and skills.
Credit: www.tiktok.com
Types Of Backup Cameras
Installing a backup camera on your car is a smart move to enhance safety and convenience. Whether you’re a seasoned DIY enthusiast or a beginner, understanding the types of backup cameras available can help you choose the right one for your vehicle. Let’s explore the different types of backup cameras and find out which suits your needs best.
Wired Cameras
Wired backup cameras are known for their reliability. They connect directly to your vehicle’s display through a physical cable, ensuring a stable and clear image. This type of camera is ideal if you’re concerned about signal interference.
However, installing a wired camera can be a bit more complex. It involves routing the cable through the car, which might require some disassembly. But if you’re up for the challenge, the payoff is a dependable view every time you reverse.
Wireless Cameras
Wireless cameras offer the convenience of easy installation. They transmit video signals via Bluetooth or Wi-Fi, eliminating the need for extensive wiring. This makes them a popular choice for DIY enthusiasts who prefer a straightforward setup.
While wireless cameras are easier to install, they can sometimes suffer from signal interference. Consider your environment and how often you drive in areas with potential signal disruption before opting for this type.
Dash-mounted Cameras
Dash-mounted cameras provide versatility. They can be placed on your dashboard, giving you a direct view of what’s behind your car. This type is perfect if you want a camera that can easily be moved between vehicles.
These cameras often come with adjustable lenses to help you find the perfect angle. They are generally easy to install and remove, making them a practical choice for temporary use.
License Plate Cameras
License plate cameras are discreet and blend seamlessly with your car’s design. They attach directly to your license plate frame, providing a clean and unobtrusive look. This type is ideal if you’re concerned about aesthetics.
Installation is usually straightforward, as they don’t require drilling or extensive setup. Their placement near the ground can offer a unique perspective, helping you see obstacles that might be missed by other camera types.
Each type of backup camera has its unique benefits and challenges. Consider your technical skills, your vehicle’s configuration, and your specific needs. Which camera type do you think would best fit your lifestyle?
Tools And Materials Needed
Installing a backup camera on your car can significantly enhance safety by providing a clear view of what’s behind you. Before starting the installation, you need to gather the right tools and materials. Knowing exactly what you need can save you time and prevent frustration during the process.
Essential Tools
- Screwdriver Set:A basic set will help remove any screws in the dashboard or trunk area.
- Wire Strippers:These are crucial for connecting the camera wires to your car’s electrical system.
- Electric Drill:Needed for creating holes to mount the camera securely.
- Multimeter:Useful for checking the voltage and ensuring correct wire connections.
Think about the last time you tried to fix something without the right tools. Frustrating, right? Having these essential tools on hand will make your installation smoother and more efficient.
Optional Accessories
- Dash Monitor:If your car doesn’t have a built-in display, consider a dash monitor for viewing the camera feed.
- Extension Cables:These can be handy if your vehicle is larger and requires longer wiring.
- Backup Camera Mount:Provides additional stability and can be adjusted for the perfect angle.
- Heat Shrink Tubing:Offers protection for wires and ensures a clean installation.
Imagine having a crystal-clear view of your surroundings every time you reverse. These optional accessories can enhance your setup and provide additional functionality. What extra features would make your driving experience more comfortable?
Now that you’re equipped with the right tools and accessories, you’re one step closer to a safer driving experience. Let’s move forward with the installation and transform your car into a more secure vehicle.
Choosing The Right Backup Camera
Choosing the right backup camera involves assessing your car’s design and compatibility with the device. Ensure the camera offers clear images and fits seamlessly into your vehicle.
Choosing the right backup camera for your car is an essential step to enhance your driving safety. With so many options available, it’s easy to feel overwhelmed. However, focusing on key factors can simplify your decision-making process and ensure you select the best camera for your needs.Compatibility With Vehicle
It’s crucial to ensure the backup camera is compatible with your car’s make and model. Many vehicles have specific requirements or preferred camera types. Double-check the camera’s specifications and compare them to your vehicle’s interface and dimensions. Think about your car’s existing wiring system. Some cameras might require additional adapters or connectors. Consulting your car’s manual or a professional can save you from potential headaches.Camera Features To Consider
Backup cameras come with a variety of features, and understanding them can significantly impact your choice. Consider the camera’s resolution. Higher resolution cameras offer clearer images, which is vital for spotting obstacles. Next, think about the field of view. A wider field of view provides better coverage, reducing blind spots. However, balance is key—too wide, and the image might appear distorted. Night vision is another feature you shouldn’t overlook. Driving at night presents unique challenges, and a camera with good night vision capabilities can be a lifesaver. Look for cameras with infrared LEDs for improved night-time visibility. Lastly, consider whether you want additional features such as parking guidelines or a built-in microphone. These extras can enhance usability, but make sure they align with your needs and budget. Choosing a backup camera is about finding the right fit for your vehicle and your driving habits. Have you considered what features are truly essential for your safety and convenience?Preparing Your Vehicle
Installing a backup camera enhances safety by providing a clear view behind your vehicle. Begin by selecting a suitable camera kit and gather necessary tools. Follow the installation instructions carefully to connect the camera to your car’s monitor. Ensure all wires are secured and test the camera for proper operation.
Preparing Your Vehicle Getting ready to install a backup camera involves a few crucial steps that set the foundation for a successful installation. It’s not as daunting as it sounds. With a little preparation, you can ensure everything goes smoothly. By taking a few moments to prep your car, you’ll save time and avoid unnecessary hiccups.Locating The Installation Spot
The first decision you need to make is where to place the camera. Typically, the best spot is near the license plate or on the rear bumper. This location provides a clear view behind your vehicle. Consider the angle and height to ensure optimal visibility. Imagine reversing with confidence, knowing you’ve chosen the perfect spot. Think about how often you parallel park or back out of tight spaces.Cleaning The Area
Once you’ve picked the spot, it’s time to clean it. A clean surface ensures the camera adheres well and functions properly. Use a soft cloth and mild detergent to remove any dirt or grime. Don’t skip this step, as a clean area can prevent long-term issues. Dirt can interfere with the camera’s adhesive and its performance. Would you trust a camera that’s mounted on a dusty surface?Installing The Backup Camera
Installing a backup camera enhances safety by providing a clear rear view. Mount the camera on the license plate or bumper, ensuring it’s securely fixed. Connect the wires to the car’s power source and display unit for seamless integration.
Installing a backup camera can enhance safety and convenience in your vehicle. The process might seem daunting, but with clear guidance, it’s manageable. Let’s break down the installation into simple steps.Mounting The Camera
Start by selecting the best spot for the camera. Most people choose above the license plate. This position gives a good view of the rear. Use the screws provided with the camera kit. Ensure it’s secure but not too tight. The camera should face downward slightly. This angle helps cover the blind spots.Connecting The Camera To Power
The camera needs power to function. Locate the reverse light wires in your car. These wires activate when you shift into reverse. Connect the camera’s power wires to these. Use a wire stripper to expose the wires. Twist the camera wires with the reverse light wires. Secure them with electrical tape. Ensure the connection is tight to prevent issues.Routing The Cables
Cables should be routed safely to avoid damage. Start from the camera and move towards the front of the car. Hide the cables under the car’s trim panels. Use cable ties to keep them in place. Avoid areas that get hot or have moving parts. This will protect the cables from wear and tear. Finally, connect the video cable to your display unit. Test the setup to ensure everything works smoothly.Connecting To The Display
Connect the backup camera to the display by using the appropriate cables. Ensure a secure and firm connection. Adjust the display settings to get a clear view.
Connecting your backup camera to a display is where the magic happens. It’s the final step that transforms your parking experience from guesswork to precision. Whether you’re using an existing display or installing a new monitor, this step is crucial for ensuring that your camera feeds you clear, actionable visuals.Using Existing Display
If your car already has a display, you’re in luck. Many modern vehicles come equipped with screens that can easily connect to a backup camera. Check your car’s manual to see if it supports video input from external sources. Often, there’s a hidden port at the back of the existing display where you can plug in your camera’s video cable. Once connected, switch on your car to test if the camera feed appears. Imagine the relief of seeing obstacles clearly laid out instead of guessing their distance.Installing A New Monitor
No built-in display? No problem! Installing a new monitor is easier than it sounds. You can opt for rearview mirrors with integrated monitors or standalone screens mounted on your dashboard. Choose a monitor size that suits your preference without obstructing your view. Make sure it has a video input compatible with your camera’s output. Securely mount the monitor in a location that is easy to glance at while reversing. With a new monitor, you take control, customizing your setup to fit your specific needs and style. Isn’t it exciting to think that a simple install can enhance safety and convenience in your driving routine?
Credit: www.youtube.com
Testing The Camera System
Testing the camera system ensures a smooth installation. Check the camera angle and screen visibility. Adjust the settings for optimal performance and safety.
Testing the camera system is a crucial step in ensuring your new backup camera functions flawlessly. After installation, it’s time to verify that everything is working as it should. This process might seem tedious, but it’s essential for safe driving and avoiding potential mishaps.Checking Video Feed
Begin by turning on your car and shifting into reverse. Your camera should automatically activate and display a clear image on your monitor. If the screen remains blank or fuzzy, check the connections and ensure the camera is securely attached. Look for any signs of interference or static in the video feed. This could indicate a loose wire or a need for better grounding. Make sure the image aligns with what you’d expect to see directly behind your vehicle.Adjusting Camera Angle
The camera angle is pivotal for a comprehensive view. Adjust the camera until you can see both the rear bumper and a reasonable distance behind your vehicle. This ensures you have a full perspective, minimizing blind spots. Ask yourself: can you comfortably see any potential obstacles? If not, try repositioning the camera slightly up or down. You might need to make several adjustments to get it just right. Keep testing by backing up in different environments. Each setting can offer unique lighting and visibility challenges. Adjust accordingly to ensure optimum performance in all conditions.Troubleshooting Common Issues
Installing a backup camera often involves wiring issues. Ensure connections are secure to avoid poor video quality. Double-check power supply and ground wires to prevent camera malfunction.
Installing a backup camera on your car can greatly enhance your driving experience, offering that extra pair of eyes when you need it most. Yet, like any tech addition, it’s not always smooth sailing. Troubleshooting common issues is part of the process, but with a little patience and know-how, you can easily resolve these problems. Whether your screen is blank or the image quality is poor, identifying and fixing these issues can be straightforward. Let’s dive into some common problems you might face and how to tackle them effectively.No Video Signal
Finding a blank screen instead of a clear view of your surroundings can be frustrating. This often boils down to a few simple culprits like loose connections or power issues. Start by checking all cable connections to ensure they are secure. If the connections seem fine, verify that the camera is receiving power. Use a multimeter to check the voltage at the camera’s power source. If there’s no power, examine the fuse linked to your camera system. A blown fuse is an easy fix—just replace it, and you might see your video signal return.Poor Image Quality
Blurry or distorted images can make your backup camera almost useless. This issue is often caused by dirt or water on the camera lens. Regularly clean the lens with a soft cloth and a bit of window cleaner. Adjusting the camera’s angle can also help. Sometimes, simply changing the camera’s position can improve the image quality significantly. If these steps don’t work, consider checking the video settings on your display unit. Ensure the brightness, contrast, and saturation settings are optimized for clear viewing.Camera Disconnections
Intermittent camera disconnections can be a real nuisance. This problem is frequently due to loose wiring or poor-quality connectors. Inspect the wiring for any visible damage or wear and tear that could be causing intermittent connectivity. Replace any damaged cables and ensure all connections are tight. If your camera is wireless, interference might be the issue. Try repositioning the receiver or camera to avoid obstructions and reduce interference. Are all your devices updated? Sometimes, a simple software update is all it takes to resolve connectivity issues. By methodically addressing these common issues, you can ensure your backup camera works efficiently, providing you with a reliable view each time you reverse. Have you ever faced any of these issues? How did you solve them? Share your experience in the comments below!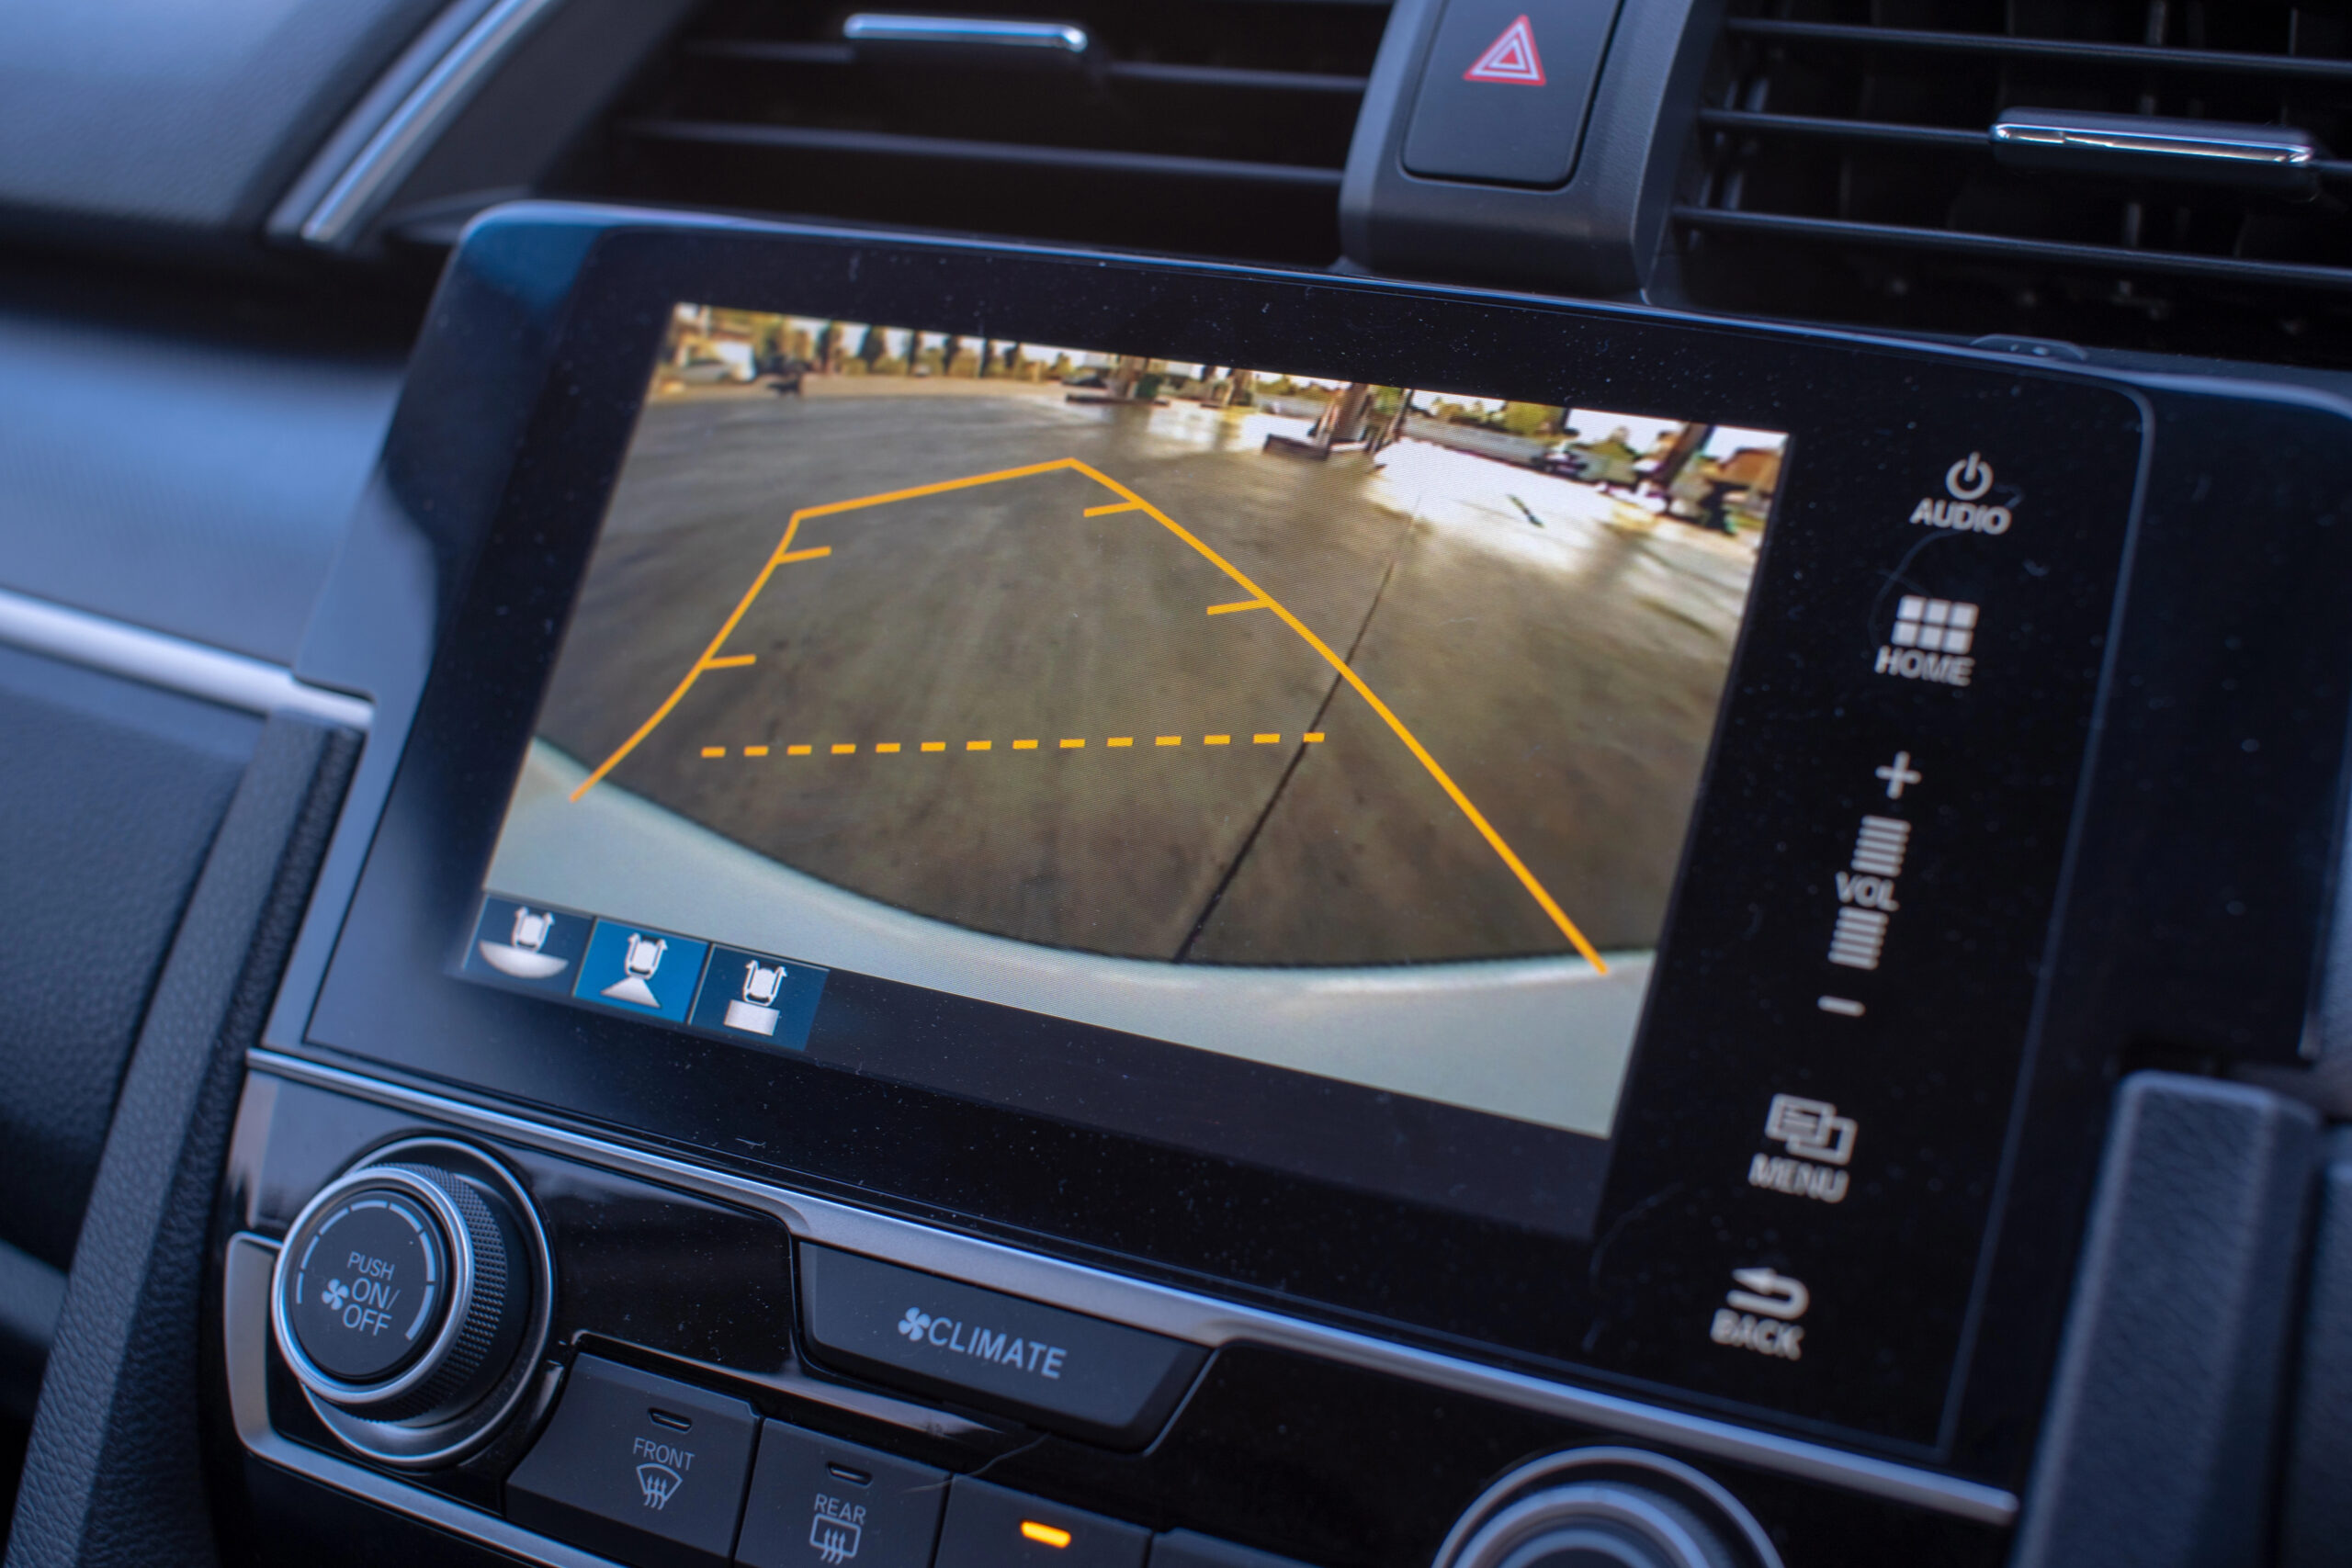
Credit: jerry.ai
Maintenance Tips
Installing a backup camera improves safety. First, identify the best position for the camera on your car. Use manufacturer instructions for a secure attachment, ensuring proper wiring for clear visuals.
Keeping your backup camera in top shape ensures it functions correctly when you need it most. Regular maintenance can save you from potentially costly repairs and keep your driving experience smooth and safe. Here are some practical maintenance tips to help you take care of your backup camera.Regular Cleaning
Backup cameras are exposed to dust, dirt, and weather elements, which can cloud the lens. Cleaning the camera lens regularly is crucial for a clear view. Use a soft microfiber cloth to gently wipe the lens, avoiding scratches. If the lens is particularly grimy, a mixture of water and mild soap can help. Avoid harsh chemicals as they may damage the lens coating. Remember, a clean lens is essential for clear images.Periodic Checks
Conducting periodic checks ensures that your backup camera is functioning optimally. Start by checking the alignment. Is the camera providing a straight view, or has it shifted? Inspect the wiring for any visible damage. Loose or frayed wires can lead to connectivity issues. Make sure that all connections are secure and intact. Consider using a friend or family member to help you test the camera’s view from the driver’s seat. Does the display show any glitches or distortions? Identifying issues early can prevent bigger problems later. Maintenance may seem like a chore, but it’s a small price to pay for your safety and peace of mind. Are you ready to make these checks a regular part of your car care routine?Frequently Asked Questions
What Tools Do I Need For Installation?
To install a backup camera, you’ll need basic tools like a screwdriver, drill, and wire strippers. Additionally, a voltage tester is helpful for electrical connections. Ensure you have the camera kit’s manual for specific requirements. Always prioritize safety by disconnecting the car battery before starting the installation.
How Do I Connect The Camera To My Car?
To connect the camera, locate your vehicle’s reverse light wiring. Splice the camera’s power cable into this wire. This ensures the camera activates when reversing. Next, run the video cable to your dashboard monitor. Follow the camera kit instructions for detailed guidance.
Can I Install A Backup Camera Myself?
Yes, you can install a backup camera yourself with basic tools and skills. Follow the camera kit’s instructions carefully. Ensure all connections are secure and test the camera before finalizing the installation. If unsure, consulting a professional can ensure optimal performance.
How Long Does Installation Typically Take?
Installing a backup camera usually takes between 1 to 3 hours. This depends on your experience and the complexity of the vehicle. Preparing tools and reading the manual beforehand can streamline the process. Ensure to allocate enough time to avoid rushing the installation.
Conclusion
Installing a backup camera enhances your driving safety. It’s a simple process. With the right tools, anyone can do it. Read your camera’s manual carefully. Follow each step with patience. This will prevent errors. Double-check connections for reliability. Make sure your camera is secure.
Test it before hitting the road. A properly installed camera helps you park better. It reduces blind spots. Enjoy peace of mind while driving. Remember, practice makes perfect. You’ll soon get used to this helpful device. Your driving experience will improve significantly.
Stay safe and happy driving!