
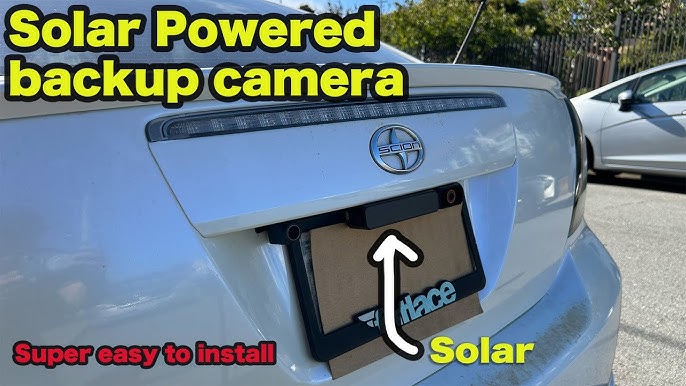
Ever found yourself squinting at mirrors or craning your neck to avoid obstacles while reversing your car? Installing a wireless backup camera might just be the game-changer you need.
Imagine effortlessly gliding into tight parking spots with confidence, or having a clear view of what’s behind you, all on a screen right in front of you. This guide will walk you through the simple steps to install a wireless backup camera on your car, ensuring that you can boost your safety and convenience without breaking the bank.
You’ll soon realize how this small upgrade can transform your driving experience. Ready to enhance your car with cutting-edge technology? Let’s get started!
Choosing The Right Wireless Backup Camera
Installing a wireless backup camera can enhance safety and convenience. Choosing the right camera is crucial to meet your needs and budget. Consider various types and features available to make an informed decision.
Types Of Wireless Backup Cameras
Different wireless backup cameras suit various preferences. Here are some popular types:
- License Plate Cameras:These mount easily over the license plate. They offer a discreet look and simple installation.
- Surface-Mounted Cameras:These attach to the rear bumper. They provide a wider view, useful for larger vehicles.
- OEM Cameras:These mimic factory-installed options. They blend seamlessly with your vehicle’s design.
Key Features To Consider
Focus on essential features for a practical choice:
- Resolution:High-resolution cameras deliver clearer images. This aids better decision-making when reversing.
- Night Vision:Night vision ensures safety in low light. Infrared LEDs are common for this feature.
- Field of View:A wider field of view offers better coverage. It minimizes blind spots.
- Weather Resistance:Ensure the camera withstands rain and dust. Look for IP ratings to confirm durability.
- Compatibility:Check compatibility with your vehicle. Ensure it pairs easily with your display system.
Gathering Necessary Tools
Installing a wireless backup camera can greatly enhance your driving experience. To ensure a smooth installation process, gathering the necessary tools is essential. Having the right tools on hand will save you time and effort, and prevent any frustration. Whether you’re a seasoned DIY enthusiast or a beginner, preparing your toolkit is the first step to success.
Basic Tools Required
- Screwdriver: A versatile tool for removing screws and panels.
- Wire Stripper: Essential for preparing wires for connection.
- Drill: Needed for mounting the camera securely.
- Wrench: Useful for tightening bolts and nuts.
- Electrical Tape: Protects connections and prevents short circuits.
Additional Accessories
- Mounting Bracket: Ensures the camera is positioned correctly.
- Power Adapter: Powers the camera without draining the car battery.
- Extension Cable: Helpful if the camera’s cord is too short.
- Fuse Tap: Connects the camera to the car’s fuse box safely.
- Multimeter: Checks voltage and continuity for electrical connections.
Preparing Your Vehicle
Ensure your car is parked safely and turned off before installation. Attach the camera to the license plate holder and connect the monitor inside the vehicle. Follow the manufacturer’s instructions for syncing the camera and monitor wirelessly.
Preparing Your Vehicle Before installing a wireless backup camera, preparing your vehicle is crucial. A proper setup ensures your camera functions optimally and lasts longer. This involves selecting the right installation spot and cleaning the area. Both steps are vital for a seamless installation process.Selecting The Installation Spot
Choosing where to place the camera matters. The spot should provide a clear view of the rear. Look for a central position above the license plate or near the rear bumper. This location helps capture a wide-angle view. Ensure the spot is easily accessible for wiring. Check for enough space to mount the camera securely. Avoid spots with obstructions or uneven surfaces.Cleaning The Installation Area
A clean surface is essential for mounting the camera. Dirt or debris can affect adhesive strength. Start by wiping the area with a damp cloth. Remove dust, grease, or grime thoroughly. Use a mild soap solution if needed. Dry the surface completely before proceeding. This ensures the camera adheres firmly, reducing the risk of it falling off.
Credit: manuals.plus
Installing The Camera
Mount the camera securely on the rear of the car. Connect it to the wireless transmitter. Sync the camera with the car’s monitor for a clear view while reversing.
Installing a wireless backup camera on your car can greatly improve your parking skills and enhance safety. But how do you get started? This section will guide you through the process of mounting the camera and connecting it to power. Whether you’re a seasoned DIY enthusiast or a complete novice, you’ll find the steps straightforward and rewarding. Let’s dive into it!Mounting The Camera
First, choose the right spot for your camera. The license plate area is often the best choice, as it provides a clear view of what’s behind your vehicle. Make sure the camera’s lens is unobstructed and aimed correctly. Test different angles by temporarily mounting the camera and reviewing the display on your monitor. Once satisfied with the position, use the provided screws or adhesive to secure the camera firmly in place. A stable mount ensures consistent and reliable performance. Who knew precision could be so empowering?Connecting The Camera To Power
Locate your car’s reverse light wiring. This is typically found in the trunk or rear light assembly. Use a wire stripper to expose the wires and connect the camera’s power cable. This connection will ensure the camera activates only when the car is in reverse, saving energy and reducing distractions. Secure the wiring with electrical tape or zip ties to prevent any loose ends. A tidy setup not only looks professional but also avoids potential snags. Are you ready to enjoy a seamless driving experience with your new backup camera?Setting Up The Monitor
Position the monitor securely on the dashboard. Ensure clear visibility for easy viewing while driving. Connect the monitor to the camera’s wireless receiver for seamless operation.
Setting up the monitor for your wireless backup camera is crucial. It ensures you get clear visuals while reversing. This step involves mounting the monitor and pairing it with the camera. Follow these simple instructions for a successful installation.Mounting The Monitor
Choose a visible spot on your dashboard. It helps to keep the monitor within your line of sight. Clean the area to remove dust and dirt. Use a microfiber cloth for best results. Attach the monitor’s bracket using screws or adhesive. Ensure it’s stable and doesn’t wobble. Connect the monitor to the car’s power source. Use the cigarette lighter or fuse box. Make sure the cables are secure and not obstructing your view.Pairing The Monitor With The Camera
Turn on the monitor and the camera. Check if both devices have power. Press the pairing button on the monitor. Refer to the manual if needed. Hold the camera close to the monitor. This helps in establishing a strong connection. Wait for the pairing process to complete. A signal or beep usually indicates success. Test the setup by reversing your car. Ensure the monitor displays a clear image. Adjust the camera angle if necessary.
Credit: www.tiktok.com
Testing The System
Once you’ve installed your wireless backup camera, it’s crucial to test the system to ensure everything is working seamlessly. Testing isn’t just about switching it on; it’s about making sure it performs as expected under different conditions. You’ll want to be confident that the camera provides a clear view and maintains a stable connection while you’re driving. Remember, the ultimate goal is to enhance your safety and driving experience, so take the time to test thoroughly.
Checking Camera Angle
Adjusting the camera angle is a simple yet vital step. Position the camera so it captures the widest possible view behind your vehicle. A slight tilt can make a huge difference in visibility. Consider this: Can you see both the bumper and the horizon? If not, tweak the angle until the view is optimal. It’s not just about seeing what’s directly behind you; it’s also about anticipating obstacles from a distance.
Ensuring Signal Stability
Signal stability is key to a reliable backup camera system. Drive around different locations to test the camera’s connection. Does the signal drop in certain areas? If so, troubleshoot for interference from other devices or obstructions. A stable signal means uninterrupted visibility, which is critical for safe driving. You may not realize how much you rely on it until you experience a signal drop.
Testing the system might seem tedious, but it’s the most effective way to guarantee safety and functionality. Have you ever felt uneasy backing out of a tight spot? Proper testing can alleviate those concerns and boost your confidence on the road. Take the time now to test thoroughly, and you’ll thank yourself later for the peace of mind it brings.
Troubleshooting Common Issues
Troubleshooting common issues with your wireless backup camera can be frustrating, but it’s a crucial part of ensuring your camera functions correctly. Whether you’re dealing with power issues or interference in your video feed, understanding these problems can save you time and effort. Let’s dive into some specific concerns and how you can address them effectively.
Camera Not Turning On
Imagine setting up your wireless backup camera only to find it won’t turn on. This can be disheartening, but it’s often a simple fix. First, check the power supply. Ensure the camera is connected to a reliable power source. If it’s battery-powered, consider replacing the batteries with fresh ones.
Another common culprit is a loose connection. Ensure all wires are securely attached and check for any signs of wear or damage. A quick inspection might reveal the issue. Remember, sometimes a simple reset can work wonders. Try powering down your camera and then turning it back on.
Interference In Video Feed
Experiencing interference in your video feed can hinder your ability to use the backup camera effectively. This often stems from signal interference. Consider the placement of your camera and receiver. Are they too far apart? Bringing them closer can improve signal quality.
Another factor could be external devices causing interference. Look around for nearby electronics that could be affecting the signal. Switching off or relocating these devices might clear up the video feed. Lastly, examine the frequency settings of your camera; sometimes adjusting these can reduce interference.
Have you ever had a moment where technology didn’t cooperate? That’s part of the journey. With these troubleshooting tips, you can tackle common issues head-on and keep your wireless backup camera running smoothly. What other challenges have you faced while installing new gadgets in your car?

Credit: www.youtube.com
Maintenance Tips
Installing a wireless backup camera on a car involves placing the camera securely on the rear. Connect the camera to a power source, often the reverse light. Sync the camera with the monitor inside the car using the wireless feature, ensuring the display functions properly.
Maintaining your wireless backup camera is crucial to ensure its longevity and optimal performance. While installation is a significant first step, regular maintenance will keep your camera functioning like new. Here are some essential maintenance tips to help you get the most out of your wireless backup camera.Regular Cleaning
Regular cleaning is essential for keeping your backup camera lens clear and functional. A dirty lens can obscure your view and defeat the purpose of having a backup camera. Use a soft cloth or a microfiber cloth to gently wipe the camera lens. A little water or a lens cleaner spray can help remove stubborn dirt. Avoid using harsh chemicals or abrasive materials, as these can scratch the lens. Consider setting a reminder to clean your camera every couple of weeks, or more frequently if you drive in dusty or muddy conditions. This simple routine can make a big difference in the clarity of your camera feed.Software Updates
Just like your smartphone, your wireless backup camera may need regular software updates. These updates can improve functionality, fix bugs, and occasionally add new features. Check the manufacturer’s website or user manual for information on how to update your camera’s software. Some systems might offer automatic updates, while others require a manual download and installation process. Keeping your software up-to-date ensures that your camera operates smoothly and efficiently. Remember, ignoring software updates can leave your system vulnerable to glitches or security issues. Regularly updating your camera’s software is a simple way to maximize its performance and security.Frequently Asked Questions
How Do You Install A Wireless Backup Camera?
To install a wireless backup camera, first, choose a suitable mounting location. Attach the camera to your vehicle’s rear. Connect the transmitter to the camera and power it using the reverse light. Pair the camera with the monitor inside your car.
Test the system to ensure proper functionality.
Do Wireless Backup Cameras Need Wi-fi?
No, wireless backup cameras don’t need Wi-Fi to function. They use radio signals to transmit video to the monitor. This setup allows real-time video streaming without an internet connection. It’s a convenient solution for those who want to avoid complicated wiring.
Can I Install A Backup Camera Myself?
Yes, you can install a backup camera yourself. Most wireless systems are user-friendly and come with instructions. Basic tools and minimal technical skills are needed for installation. Follow the manufacturer’s guidelines carefully to ensure proper installation and functionality.
How Do Wireless Backup Cameras Get Power?
Wireless backup cameras typically get power from the vehicle’s reverse light. Connect the camera’s power cable to the reverse light wiring. This setup ensures the camera activates automatically when the vehicle is in reverse. Alternatively, some models use rechargeable batteries for power.
Conclusion
Installing a wireless backup camera is easier than you think. Follow the steps carefully. Safety is the main goal. Check the camera before driving. It adds security and peace of mind. Always park with ease. Enjoy better visibility when reversing.
A wireless camera helps avoid accidents. It’s a smart upgrade for your car. Feel confident on the road. Your car deserves this useful addition. Experience a safer drive every time. Share this guide with your friends. Help them install their cameras too.
A small effort for big benefits. Drive safely and stress-free!