
Have you ever wondered how to connect a dash cam to your car battery efficiently and safely? Imagine having the peace of mind knowing that your dash cam is capturing every important moment on the road without interruptions.
Whether you’re safeguarding against accidents or simply wanting to document your scenic drives, connecting your dash cam directly to the car battery ensures a reliable power source. This guide will walk you through the simple steps, making it easy for you to achieve a seamless installation.
Don’t leave your dash cam’s functionality up to chance—let’s make sure it’s powered up and ready to serve you whenever you need it. Dive into the article to discover how straightforward it can be to integrate your dash cam with your vehicle’s power system!
Choosing The Right Dash Cam
Choosing the right dash cam is crucial for ensuring a seamless connection to your car battery and capturing high-quality footage. With numerous options available, it’s essential to focus on specific features and compatibility with your vehicle. Whether you’re a daily commuter or a road trip enthusiast, finding the perfect dash cam can make all the difference in your driving experience.
Features To Consider
When selecting a dash cam, prioritize features that suit your driving needs. Look for models with high-resolution video recording, as they offer clearer images that can be critical in case of accidents. A wide-angle lens is beneficial for capturing more of the road, providing a comprehensive view of your surroundings.
Consider dash cams with night vision capabilities if you frequently drive in low-light conditions. Built-in GPS can be advantageous for logging your routes and speeds. Additionally, a dash cam with Wi-Fi connectivity allows you to easily transfer footage to your smartphone for quick access.
Compatibility With Your Vehicle
Before purchasing a dash cam, ensure it is compatible with your car’s battery and electrical system. Some dash cams require direct wiring to the battery, while others can connect through a cigarette lighter or USB port. Check your vehicle’s specifications and choose a model that aligns with its power source.
Consider the size and mounting options of the dash cam to ensure it fits well within your vehicle’s interior. You don’t want a bulky device obstructing your view while driving. A dash cam that blends seamlessly with your car’s design can enhance aesthetics while providing functionality.
Tools And Materials Needed
Gather the dash cam, power cable, and fuse tap kit. A wire stripper and electrical tape are essential. Ensure you have a multimeter to check the car battery voltage.
Connecting a dash cam directly to your car battery might seem daunting at first, but with the right tools and materials, it’s a straightforward task. Before diving into the installation, you’ll need to gather several essential tools and safety equipment to ensure a smooth and safe process. Having everything on hand will not only save time but also prevent unnecessary trips to the hardware store. Let’s break down what you’ll need to get started.Essential Tools
To successfully connect your dash cam to your car battery, you’ll need a few key tools. First and foremost, a reliable multimeter is crucial. This tool will help you check the voltage and ensure that your connections are correct. It’s a lifesaver for anyone not completely familiar with car electronics. Next, a wire stripper is essential for removing the insulation from the wires you’ll be connecting. This ensures a clean and solid connection. Pair this with a set of screwdrivers, preferably both Phillips and flathead, as you’ll need them to open panels and secure connections. Don’t forget a solid set of pliers for bending and adjusting wires to fit your setup.Safety Equipment
Safety should always be your priority when working with car electronics. Ensure you have a pair of insulated gloves to protect yourself from any unexpected electrical shocks. These gloves are your first line of defense, especially if you’re not accustomed to working with live wires. Additionally, safety goggles are a must-have to protect your eyes from any flying debris or accidental sparks. It’s a simple precaution but can prevent serious injury. Lastly, consider having a fire extinguisher nearby. While it’s unlikely you’ll need it, being prepared for any electrical mishap can make all the difference. Have you ever found yourself halfway through a project only to realize you’re missing a key tool or piece of equipment? It’s frustrating, to say the least. By gathering all the necessary tools and safety gear beforehand, you can focus on the task at hand without any interruptions. With everything prepared, you’re ready to safely and effectively connect your dash cam to your car battery. Are you ready to take on this challenge?Locating The Car Battery
Connecting a dash cam to your car battery starts with finding the battery. The car battery is usually under the hood. In some vehicles, it might be in the trunk. Knowing its location is the first step.
Accessing The Battery Compartment
To access the battery, open the vehicle’s hood or trunk. Look for a latch inside the car or near the driver’s seat. This latch will release the hood or trunk. Once opened, you will see the battery compartment.
Some vehicles have a cover over the battery. Check your car manual if you’re unsure how to remove it. Make sure your car is off before accessing the battery.
Identifying The Positive And Negative Terminals
Once you locate the battery, identify the terminals. The positive terminal usually has a plus sign (+). It is often red. The negative terminal has a minus sign (-). It is typically black.
Understanding these signs is crucial for safe installation. Connecting the wrong terminal can harm your dash cam or car battery.

Credit: www.ubuy.com.jm
Wiring The Dash Cam
Connecting a dash cam to your car battery ensures continuous power supply. Securely attach the dash cam cables to the battery terminals. This setup provides reliable recording, even when the vehicle is off, enhancing security and peace of mind.
Wiring the dash cam to your car battery can seem daunting, but it’s a straightforward process with the right guidance. A dash cam can be your silent witness on the road, capturing everything in case of an incident. But to ensure it works reliably, you need a stable power connection. This is where wiring directly to the car battery comes in. A personal tip: the first time I wired my dash cam, I felt like I was solving a puzzle. But once I figured it out, it was immensely satisfying. Let’s dive into making this process simple and effective.Connecting Power Cable To Battery
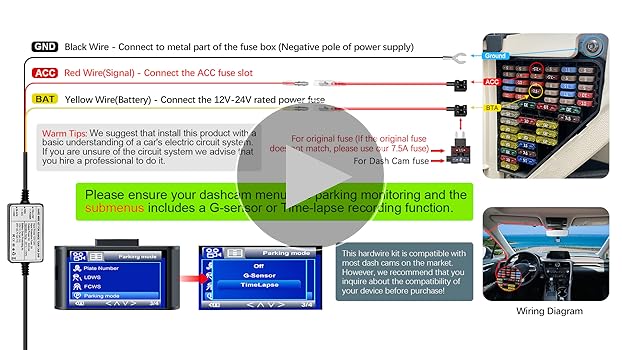
Start by identifying the power cable that comes with your dash cam. This cable is typically long enough to reach the battery from the camera’s mounting point. Route it carefully along the edge of your car’s interior to keep it out of sight and avoid interference. Ensure that you choose a path that doesn’t obstruct airbags or other essential components. Use zip ties or clips to secure the cable neatly. When you reach the battery, connect the red wire to the positive terminal and the black wire to the negative terminal. Always double-check these connections to prevent any mishaps.Using Fuse Taps For Safety
To enhance safety, consider using fuse taps. These handy devices allow you to connect your dash cam without altering the vehicle’s existing wiring. They fit snugly into your car’s fuse box, providing a secure and reliable power source. Select a fuse that provides power only when the ignition is on, ensuring your dash cam doesn’t drain the battery when the car is parked. Insert the fuse tap into the chosen slot, and connect the dash cam’s power cable to the tap. This method not only protects your car’s circuitry but also ensures a clean and professional look. Have you ever thought about what would happen if your dash cam failed during a critical moment? Proper wiring ensures you never have to find out. By following these steps, you’re not just installing a dash cam; you’re investing in peace of mind on every journey.Mounting The Dash Cam
Connecting a dash cam to your car battery ensures continuous power. Begin by locating the fuse box and identifying an accessory fuse. Use a hardwire kit to connect the dash cam, ensuring all wires are securely attached and hidden for a clean installation.
Mounting a dash cam is crucial for optimal performance. It ensures clear video capture and minimal obstructions. A well-mounted dash cam can make a significant difference in your driving experience.Optimal Placement On Windshield
Choose a spot in the center behind the rearview mirror. This ensures a wide view of the road. Avoid areas with heavy tinting or obstructions. Ensure the lens captures both lanes of traffic. Check for laws about placement in your area. Some regions have restrictions on windshield-mounted devices.Securing The Camera Firmly
Use the adhesive pad or suction cup provided. Clean the area with alcohol wipes before mounting. This removes dust and ensures strong adhesion. Press the mount firmly against the windshield. Hold for a few seconds to secure it in place. Check that the camera doesn’t wobble or move. Adjust the angle to capture the road clearly. Re-tighten any loose screws on the mount. Regularly check the camera’s stability, especially after long drives.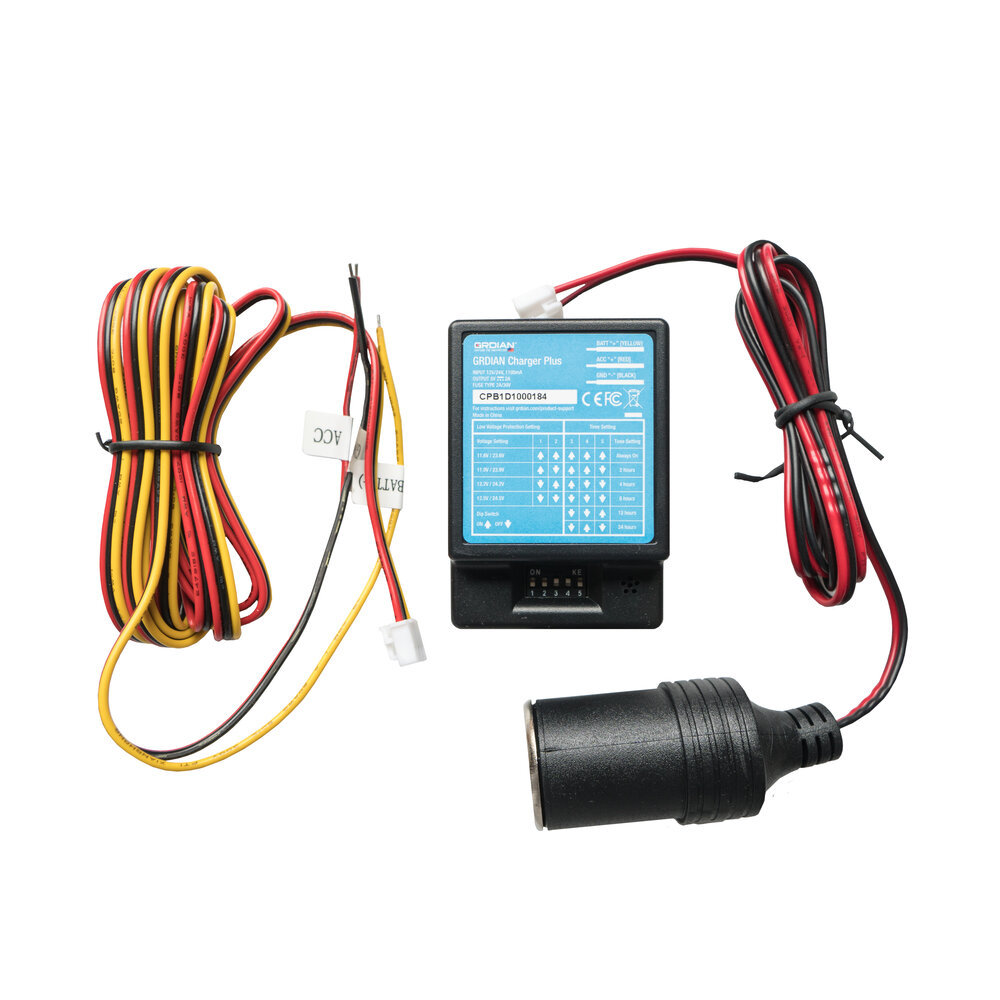
Credit: www.grdian.com
Testing The Installation
Ensure the dash cam is securely connected to the car battery. Check for proper cable connections and power supply. Verify the camera’s functionality by reviewing video footage to confirm successful installation.
Connecting your dash cam to your car battery is only half the battle. The real test lies in ensuring the setup works perfectly. Once you’ve completed the installation, it’s time to verify that everything functions as it should. Testing the installation is crucial to avoid any surprises when you need your dash cam the most.Checking Power Connection
Start by turning your car’s ignition to the ‘on’ position. Check if the dash cam powers up immediately. A steady power light indicates a solid connection. If your dash cam doesn’t turn on, inspect the wiring. Ensure all connections are secure and the fuse is intact. Consider using a multimeter to test the voltage from the battery to the dash cam. This ensures that the dash cam receives the correct power supply without fluctuations.Ensuring Proper Recording Functionality
Verify that the dash cam starts recording once powered on. Most dash cams have an indicator light or a display showing that recording is active. Review a test recording to check for clarity and coverage. This will help you adjust the camera angle if necessary. Listen to the audio, if your dash cam records sound, to ensure there’s no interference or distortion. Testing the installation is not just a technical check; it’s about peace of mind. You want your dash cam to be reliable every time you drive. Have you ever been in a situation where you wished you had clear footage? Double-checking these aspects now can save you stress later.Troubleshooting Common Issues
Connecting a dash cam to your car battery often involves identifying the correct fuse box and ensuring proper wiring. Secure connections prevent power issues and improve device functionality. Regular checks can help avoid common problems like intermittent power or recording failures.
Having trouble with your dash cam after connecting it to your car battery? You’re not alone. Many drivers encounter common issues that can be frustrating yet solvable. Let’s dive into some practical solutions to ensure your dash cam runs smoothly without interruptions.Resolving Power Problems
If your dash cam isn’t turning on, it might be a power issue. First, check the connections. Ensure that the cables are firmly attached to both the dash cam and the car battery. Sometimes, a faulty fuse can be the culprit. Look for the fuse box in your car and inspect the dash cam fuse. If it’s blown, replace it with the same amp rating. Another common issue is the car’s battery not supplying enough power, especially in older vehicles. Consider using a dedicated hardwire kit that provides a stable power source, avoiding disruptions.Addressing Video Quality Concerns
Are your dash cam recordings blurry or pixelated? Start by examining the lens. Dust and fingerprints can easily degrade video quality, so give it a gentle clean with a microfiber cloth. Next, check the video settings on your dash cam. Ensure it’s set to the highest resolution available. A lower setting might save space but sacrifices clarity. Also, consider the memory card’s speed. A slow card can cause recording issues. Opt for a high-speed card, such as a Class 10 or UHS-I, to ensure smooth and clear video capture. Isn’t it satisfying when a simple fix enhances your driving experience? Troubleshooting might seem daunting, but with a little patience and attention to detail, you can resolve these common dash cam issues with ease.Credit: dashcamtalk.com
Frequently Asked Questions
How Do You Connect A Dash Cam To A Car Battery?
To connect a dash cam to a car battery, use a hardwiring kit. Locate the fuse box and select an appropriate fuse slot. Connect the kit’s power and ground wires accordingly. This setup ensures continuous power without draining the battery when the car is off.
Is It Safe To Hardwire A Dash Cam?
Yes, hardwiring a dash cam is safe if done correctly. Use the right tools and follow instructions carefully. Ensure connections are secure to prevent electrical issues. A proper installation will avoid battery drainage and provide reliable performance.
What Tools Are Needed For Dash Cam Installation?
For dash cam installation, you’ll need a hardwiring kit, fuse taps, and a multimeter. A trim removal tool helps access panels without damage. These tools ensure a secure and efficient installation, offering continuous power to your dash cam.
Can Hardwiring A Dash Cam Drain My Battery?
Hardwiring a dash cam can drain the battery if installed improperly. Use a proper hardwiring kit with low-voltage protection. This feature prevents battery drainage by cutting power when voltage drops too low, ensuring your car’s battery remains charged.
Conclusion
Connecting your dash cam to the car battery is simple. Follow the steps carefully. Ensure proper wiring for safety. Check connections regularly to avoid issues. Choose a reliable dash cam brand. This ensures better performance and longevity. Always consult your car’s manual.
It helps avoid electrical mishaps. Basic tools are usually enough for installation. Don’t rush the process. Taking your time prevents errors. Good installation leads to effective recording. Now you’re ready for your next drive. Record important moments with confidence. Enjoy peace of mind with every journey.
Your dash cam is now securely connected.