
Have you ever found yourself in a tight parking spot, wishing you had eyes in the back of your head? Installing a backup camera in your car can feel like a game-changer, offering you peace of mind and added safety.
Imagine effortlessly maneuvering your vehicle with a clear view of what’s behind you—no more guessing or unnecessary stress. If you’re wondering how to connect a backup camera to your car, you’re in the right place. This article will guide you through the process step-by-step, ensuring you can easily enhance your driving experience.
By the end, you’ll feel empowered to tackle the task with confidence, transforming your car into a safer, smarter vehicle. Ready to dive in? Let’s get started!
Tools And Materials Needed
Gather essential tools like screwdrivers, wire strippers, and pliers. Have materials such as a backup camera, wiring kit, and electrical tape ready. These items will help you connect the backup camera to your car efficiently.
Setting up a backup camera in your car can dramatically enhance your driving safety, especially when reversing. But before you dive into the installation process, it’s essential to gather the right tools and materials. Having everything you need at arm’s length will save time and prevent unnecessary frustration.Basic Tools
To start, you will need some basic tools that are likely already in your toolbox. A Phillips screwdriver is a must for removing any panels or screws. A drill may be necessary if you need to create any holes for mounting the camera. A wire stripper is crucial for preparing the wires for connection. Don’t forget a multimeter, which can help you identify the correct wires in your car’s electrical system.Specialized Tools
While basic tools are handy, specialized tools can make the job easier. Consider getting a panel removal tool to avoid damaging your car’s interior when accessing wires. A fish tape can be invaluable for threading wires through tight spaces. Another useful tool is a heat gun, which helps to secure shrink tubing around wire connections, ensuring they are protected from moisture and wear.Materials Required
When it comes to materials, a few key items are essential. Start with the backup camera kit itself, which should include the camera, mounting hardware, and cables. You’ll also need wire connectors to securely join wires. Electrical tape will help insulate the connections, while zip ties keep everything tidy and organized.Safety Equipment
Safety should always be your top priority. Wear safety goggles to protect your eyes from any debris when drilling or handling wires. Gloves can provide protection and a better grip when working with small components. A flashlight or headlamp is useful for illuminating hard-to-see areas, ensuring you don’t miss any crucial steps.Testing Equipment
Once the installation is complete, you need to ensure everything functions correctly. A portable battery pack or jump starter can be useful for testing the camera before permanently connecting it to your car’s battery. This way, you can confirm the camera’s placement and angle are correct, providing the best possible view when reversing. Consider how these tools and materials not only streamline the installation but also provide peace of mind. What’s stopping you from upgrading your car’s safety features today?Choosing The Right Backup Camera
Connecting a backup camera to your car can enhance your driving safety. Choose a camera that suits your vehicle’s model for easy installation. Follow the manufacturer’s instructions to ensure proper wiring and integration.
Choosing the right backup camera is crucial for your car’s safety. With many options available, finding the best fit can be challenging. Some cameras offer advanced features that enhance the driving experience. Others focus on simplicity and reliability. Let’s explore key factors to help you make an informed decision.Compatibility With Your Vehicle
Ensure the camera fits your car model. Check the size and connection type. Some vehicles may require specific adapters or mounts. Verify compatibility to avoid installation issues.Camera Resolution And Quality
Choose a camera with high resolution. Clear images help in safe reversing. Look for cameras with good night vision. This ensures visibility in low light conditions.Field Of View
A wide field of view offers better coverage. This helps in spotting obstacles and blind spots. Compare different models for the best range.Durability And Weather Resistance
Select a camera built to last. Durable materials withstand harsh conditions. Weather-resistant features protect against rain and dust. Ensure the camera can handle extreme temperatures.Ease Of Installation
Some cameras are easy to install. Look for plug-and-play options. Check if professional installation is needed. This can add to the overall cost.Cost And Budget
Consider your budget when choosing. More features often mean higher prices. Compare prices and features to find value for money.Locating The Installation Area
Find a flat and stable spot at the back of your car. Ensure it’s near the license plate area. This location provides a clear view and easy cable access.
Locating the installation area for your backup camera is crucial for ensuring optimal functionality and safety. It’s like finding the perfect spot for a family portrait, but in this case, it’s about getting the best view of what’s happening behind your car. Choosing the right location can make the difference between a clear view and a distorted image. Let’s dive into where exactly you should consider placing your backup camera.Identify The Central Point
The rear center of your vehicle is typically the best spot for a backup camera. It provides a balanced view of the area behind your car. Think about how the camera will capture the widest angle without obstructions. Consider the existing elements of your car’s design, like the license plate or any trunk handles. These should not interfere with the camera’s view.Avoiding Obstacles
Make sure the chosen spot doesn’t have any obstacles blocking the view. Check for any protruding parts of the car that could obscure the camera’s vision. Ask yourself: Is the camera too close to the bumper or trunk that it could be obstructed by dirt or debris?Weather Considerations
Choose a location that offers some protection against the elements. Will rain or snow affect the camera’s performance? Ensure the spot is slightly shielded, perhaps under the lip of the trunk, to prevent weather-related issues.Wiring Ease
Locate an area that allows for easy wiring to the car’s electrical system. The installation process should not involve excessive drilling or complex wire routing. Is there a nearby access point to the trunk’s wiring system? This can save time and effort during installation.Personal Experience Insight
When I installed my backup camera, I initially chose a spot near the license plate. However, I quickly realized that the view was partially blocked by the plate frame. I moved it higher, next to the trunk handle, and it made a world of difference. What lessons can you draw from my experience? Always double-check the view before finalizing the installation spot.
Credit: www.amazon.com
Mounting The Camera
Mounting a backup camera on your car is a crucial step in enhancing your driving safety. It’s not just about screwing a camera onto your vehicle; it’s about precision and ensuring the camera is positioned for optimal visibility. Let’s dive into the practical steps to mount your camera effectively.
Attaching The Camera Bracket
Begin by securing the camera bracket to your vehicle’s rear. Choose a spot that’s stable and provides a clear view of the area behind the car.
Use sturdy screws and ensure the bracket is tightly fixed to prevent any wobbling during drives. A loose bracket can lead to blurred images, compromising safety.
Consider using brackets with adjustable angles. These give you the flexibility to tweak the camera’s position for better coverage.
Positioning The Camera
Now that your bracket is securely in place, it’s time to position the camera. The ideal spot is usually just above or below the license plate.
Ensure the camera lens is clean and free from obstructions. Even a small speck of dirt can significantly affect image clarity.
Think about your daily parking habits. Is there a particular blind spot you struggle with? Position your camera to eliminate this issue, making your driving experience safer.
Wiring The Camera
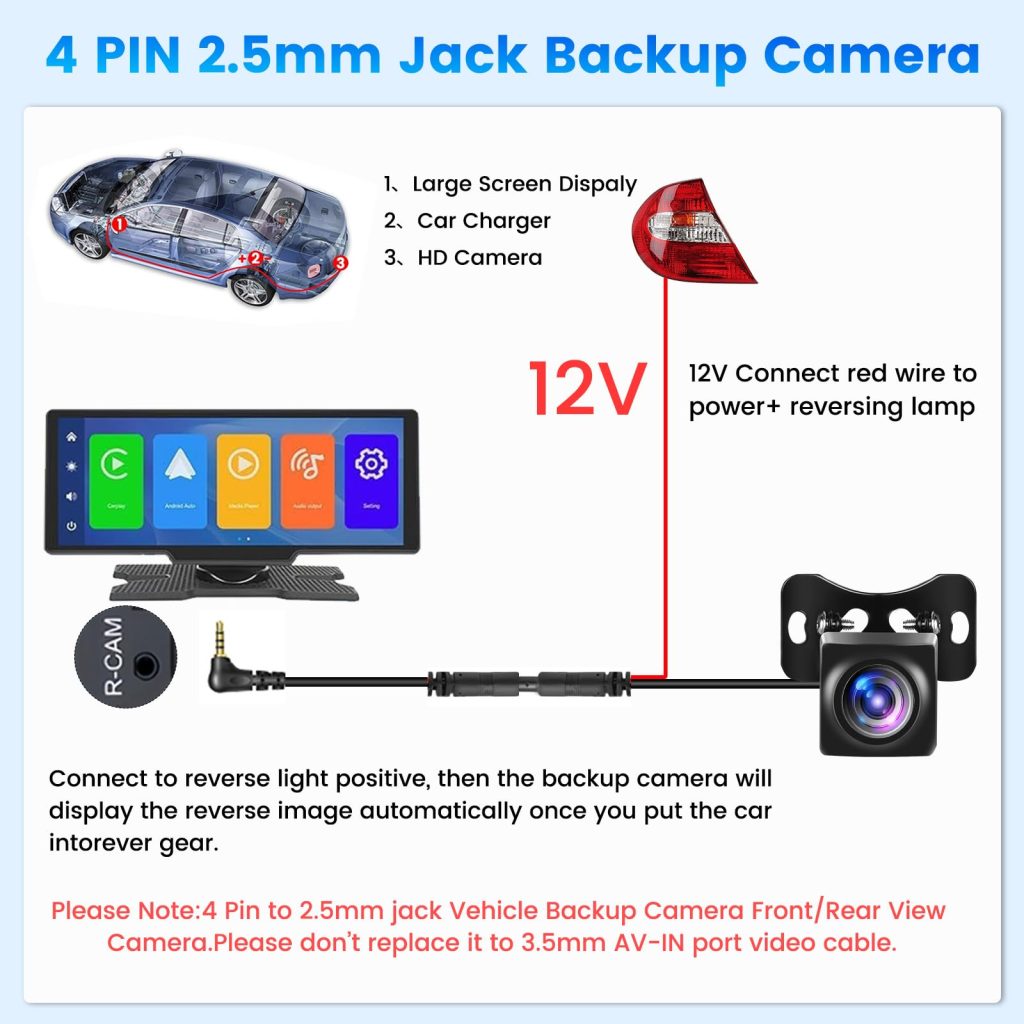
Connecting a backup camera to your car involves attaching the camera’s power and video cables. Link the video cable to the monitor and power cable to the reverse light circuit. Ensure all connections are secure for optimal performance.
Wiring a backup camera to your car can seem daunting. Yet, with the right guidance, it’s straightforward. Proper wiring ensures your camera works reliably. Let’s explore the steps involved in wiring the camera.Connecting Power Wires
To start, locate the reverse light wires at the rear of your car. These wires power the backup camera. Use a test light or multimeter to identify the correct wires. Connect the camera’s power wire to the positive reverse light wire. Secure the connection using a wire connector or soldering. Ensure the ground wire of the camera is attached. You can connect it to the car’s metal body or frame. This ensures a stable power connection.Running The Video Cable
Next, run the video cable from the camera to the display. Start by feeding the cable through the car’s trunk or hatch. Use existing grommets or openings to keep the cable protected. Route the cable along the car’s interior panels. Tuck it under the carpet or trim to keep it hidden. Secure the cable with cable ties or clips. Connect the video cable to the display unit in your dashboard. Ensure a snug fit for a clear video signal. Following these steps ensures your backup camera is wired correctly. This setup provides a safer and more comfortable driving experience.Connecting To The Display
Connecting a backup camera to a car display involves linking the camera’s output to the screen’s input. Securely attach the camera near the license plate and run wires through the car’s interior. Connect the camera’s video cable to the display, ensuring the connections are tight for optimal image transmission.
Connecting a backup camera to your car’s display can significantly enhance your driving experience, offering you peace of mind and a clearer view of what’s behind you. But how do you connect your backup camera to the display? It might seem daunting at first, but with the right steps, you can achieve it seamlessly. Whether you’re using an existing monitor or installing a new one, the process can be straightforward. Let’s delve into the details of connecting your camera to the display effectively.Using An Existing Monitor
If your vehicle already has an existing monitor, you’re in luck. Start by checking if your monitor has an AV input, as this is crucial for connection. Most modern cars have this feature, but it’s always good to double-check. To connect, you’ll need an AV cable that matches your camera’s output. Simply plug the camera’s video output into the monitor’s AV input. Ensure the connection is secure to avoid any flickering or signal loss. Have you ever wondered if your car’s existing monitor can handle a backup camera’s video quality? Test it out by temporarily connecting the camera and checking the display. This step ensures compatibility and helps you avoid future frustrations.Installing A New Display
Deciding to install a new display opens up more options for customization. First, choose a display that fits your car’s interior design and meets your resolution needs. Many drivers prefer displays with higher resolution for clearer images. Once you have your new display, determine the best location for installation. Most drivers opt for the dashboard or rearview mirror area for easy visibility. Positioning is key, as you want to glance at the screen without distraction. Connecting the new display involves linking it to both the backup camera and the power source. Use the provided cables to connect the video output from your camera to the new display’s input. Then, connect the display to a power source, ensuring it’s only active when the car is on. Have you considered how installing a new display might impact your daily drive? A strategically placed, high-resolution display can make reversing and parking a breeze, enhancing overall safety and convenience.Testing The Camera System
Connecting a backup camera involves mounting it and linking the wiring to your car’s system. Ensure the camera is securely attached near the license plate. Then, connect the power cables to the reverse light, allowing it to activate when the car is in reverse.
Testing the camera system is a crucial step in ensuring that your backup camera functions optimally. This process involves checking the video signal and adjusting the camera angle to ensure a clear view behind your vehicle. A well-tested camera can significantly enhance your driving experience by providing clear visuals and improving safety.Ensuring Video Signal
First, verify that the camera is transmitting a clear video signal to your monitor. Turn on your vehicle and shift to reverse to activate the camera. Check the monitor for a clear image; there should be no distortions or lag. If the signal is weak or inconsistent, inspect the wiring connections. Loose or incorrectly connected wires can cause signal loss. Re-secure any loose wires and ensure all connections are tight. Consider using a multimeter to check the voltage if issues persist. A consistent voltage reading indicates a stable power supply to your camera.Adjusting Camera Angle
Once the video signal is confirmed, adjust the camera angle for an optimal view. You want to see the bumper and the area behind your vehicle clearly. Loosen the screws holding the camera, and gently tilt it until you achieve the desired view. Tighten the screws carefully to lock the angle in place. Test the camera in various lighting conditions. Adjust again if the image is too dark or too bright in certain settings. Fine-tuning the angle ensures you have a reliable view regardless of the time of day. Do you feel confident in your camera’s positioning? A well-angled camera can make all the difference when reversing or parking. Adjusting it to your preference can enhance your overall driving safety.
Credit: www.youtube.com
Troubleshooting Common Issues
Connecting a backup camera to a car can be challenging. Ensure the wiring is correctly aligned for proper installation. Verify the camera is compatible with your vehicle’s system to avoid connection issues.
Troubleshooting your car’s backup camera can be frustrating, especially when you’re eager to enjoy the added safety it provides. But don’t worry; many common issues have simple solutions. Whether you’re dealing with no video signal or image distortion, these challenges can often be resolved with a little patience and know-how. Let’s dive into some troubleshooting tips that can help you get back on the road with a clear view behind you.No Video Signal
Encountering a blank screen when you shift into reverse can be daunting. First, ensure all connections are secure. A loose wire can easily disrupt the signal. Check the camera’s power supply. Sometimes, the fuse may blow or the power connection can be faulty. Inspect the fuse box and replace any blown fuses. Verify the video input settings on your car’s display unit. Misconfigured settings can lead to a lack of video signal. Adjust these settings to match the camera’s output.Image Distortion
If your backup camera displays a distorted image, it could be due to interference. Check nearby electronic devices that might be causing this issue. Moving them away can often clear up the distortion. Inspect the camera lens for dirt or damage. A dirty lens can blur the image, while physical damage might require camera replacement. Consider the camera’s mounting angle. An incorrect angle can skew the image. Adjust the camera to ensure it’s aligned correctly with the vehicle’s rear. Have you experienced these issues before? What did you do to resolve them? Share your insights in the comments below!Safety Tips And Best Practices
Ensure the car is parked safely before installation. Disconnect the battery to prevent electrical mishaps. Follow the manufacturer’s instructions closely for connecting the camera wires. Regularly check connections for stability and proper functioning.
Connecting a backup camera to your car can significantly enhance your driving experience, offering an extra set of “eyes” to help you park and reverse safely. However, as with any installation, safety is paramount. Following safety tips and best practices ensures not only the effectiveness of your backup camera but also your safety and that of your passengers.Understand Your Car’s Electrical System
Before you begin the installation, familiarize yourself with your car’s electrical system. Knowing which wires connect to the reverse lights is crucial. It’s a good idea to consult your car’s manual or an online resource specific to your vehicle model.Disconnect The Battery
Always disconnect your car battery before working with the electrical system. This simple step prevents accidental shocks or short circuits during the installation process. Safety first—don’t skip this.Use Proper Tools
Using the right tools makes a world of difference. Ensure you have a wire stripper, electrical tape, and a multimeter. These tools help you handle wires safely and securely.Test The Camera Before Final Installation
Once you’ve connected everything, test the camera before securing it permanently. Check the video feed to ensure it’s clear and the camera angle is correct. Adjust the position if necessary to get the best view.Secure All Wires
Loose wires can become a hazard. Use cable ties to bundle wires neatly and prevent them from interfering with moving parts. This keeps your installation tidy and safe.Regularly Inspect Your Camera
After installation, make it a habit to inspect your camera regularly. Check for any signs of wear or loose connections. Regular maintenance ensures your camera continues to function properly. By following these practices, you can enhance the reliability of your backup camera system. What other safety tips do you consider essential when installing car accessories? Share your thoughts and experiences!
Credit: www.amazon.com
Frequently Asked Questions
How Do I Install A Backup Camera In My Car?
To install a backup camera, first disconnect your car battery. Mount the camera near the license plate. Run the wires through the car’s interior, connecting them to the display unit. Finally, reconnect the battery and test the system for proper functionality.
What Tools Are Needed For Camera Installation?
To install a backup camera, you’ll need a screwdriver, wire strippers, electrical tape, and a power drill. These tools help in mounting the camera and connecting wires. Always check your car’s manual for specific tool recommendations to ensure compatibility.
Can I Connect A Backup Camera To Any Car?
Yes, most backup cameras can be installed in any car. However, compatibility with your display unit is crucial. Ensure your display supports video input. Check the camera’s compatibility with your car model for seamless integration and functionality.
How Does A Wireless Backup Camera Work?
A wireless backup camera transmits video signals to a display unit without needing cables. It uses radio frequencies to send real-time footage. This setup simplifies installation, reducing the need for extensive wiring. Ensure both the camera and monitor are compatible for optimal performance.
Conclusion
Connecting a backup camera enhances your driving safety. It’s a simple process. Follow the steps carefully. First, gather all necessary tools. Next, read the instructions in your camera’s manual. Make sure your car’s power source is suitable. Connect the camera wires securely.
Test the camera before finalizing. If unsure, seek professional help. A backup camera reduces blind spots. It makes parking easier. Drive with confidence knowing you have extra visibility. Enjoy the added convenience and safety.