
Are you tired of feeling like you’re driving in the dark even when your headlights are on? Properly aimed LED headlights can make a world of difference in your driving experience, especially during those night-time rides or in harsh weather conditions.
Imagine cruising down the road with a clear, bright view, enhancing not only your safety but also your confidence behind the wheel. In this guide, you’ll discover simple steps to adjust your LED headlights, making sure they shine just where you need them.
Say goodbye to the stress of dim or misaligned beams and hello to a safer, more enjoyable drive. Keep reading to unlock the secret to perfect headlight alignment and transform your nighttime driving experience.
Tools Required
Aiming LED headlights on a car requires a few essential tools. You’ll need a measuring tape, masking tape, and a screwdriver. A flat surface and a wall or garage door help in aligning the beams accurately.
Aiming LED headlights on your car requires specific tools for precision. Properly aligned headlights ensure optimal visibility and safety. Using the right tools makes the task efficient and straightforward. Let’s explore the essential tools you’ll need for the job.Measuring Tape
A measuring tape helps determine the height of the headlights. This measurement is crucial for accurate alignment.Screwdriver
A screwdriver is needed to adjust the screws on the headlights. This tool helps in fine-tuning the angle and direction of the light beam.Level Surface
A flat, level surface is necessary to park your car. This ensures accurate measurement and alignment without any tilt.Wall Or Garage Door
Use a wall or garage door to project the headlights. This helps visualize and adjust the alignment markings.Chalk Or Tape
Chalk or tape marks the projection spots on the wall. These marks guide you in aligning the beams correctly.Owner’s Manual
Your car’s owner’s manual provides specific instructions. It’s crucial for understanding the headlight adjustment mechanism.Socket Wrench
A socket wrench might be needed for certain headlight models. This tool helps loosen or tighten bolts during adjustment.Protective Gloves
Protective gloves ensure safety during the process. They prevent injury while handling tools and adjusting headlights.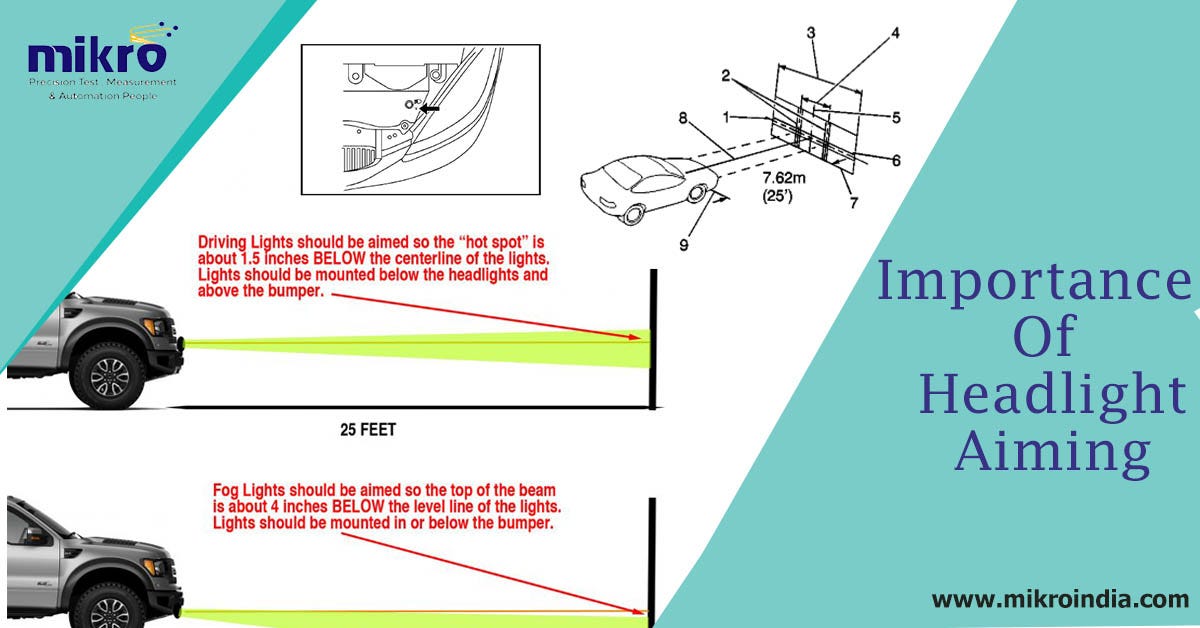
Credit: medium.com
Safety Precautions
Ensure your car is parked on a level surface before adjusting LED headlights. Use protective eyewear to guard against bright light exposure. Always turn off the car’s engine to prevent accidental movement while aiming the lights.
Safety is crucial when adjusting LED headlights. Proper precautions prevent accidents and ensure optimal lighting. Following safety guidelines helps protect you and your vehicle.Ensure Vehicle Stability
Park on level ground. Engage the parking brake. This prevents the car from moving.Wear Protective Gear
Use gloves to avoid cuts. Safety goggles protect your eyes from debris.Avoid Direct Eye Exposure
LED lights can be intense. Never look directly into them.Check Surroundings
Ensure the area is clear. Remove any obstacles from the workspace.Turn Off Engine
Shut off the car before adjustment. This prevents accidental movement.Disconnect Battery
Unplug the battery to avoid electrical issues. This adds an extra layer of safety.Use Proper Tools
Select tools designed for headlight adjustment. Improper tools can cause damage.Follow Manufacturer Instructions
Refer to the manual for guidance. Every car model has specific guidelines.Test Adjustments Safely
Test lights in a controlled environment. Ensure adjustments improve visibility without blinding others.Preparation Steps
Aiming LED headlights ensures safe driving at night. Properly aligned headlights illuminate the road effectively. This reduces glare for other drivers. Before adjusting your headlights, follow these preparation steps. These steps help in achieving accurate results.
Check Headlight Condition
Inspect the headlights for damage. Cracks and foggy lenses affect light output. Ensure they are clean and clear. Replace any broken bulbs. Proper functioning is crucial for alignment.
Park On Level Ground
Find a flat surface for parking. Uneven ground skews alignment accuracy. Ensure the vehicle is stable. This prevents misalignment during adjustment.
Measure Distance To Wall
Position the car facing a wall. Keep a 25-foot gap between car and wall. Use a tape measure for accuracy. Mark the wall at headlight height. This helps in aligning the beam precisely.

Credit: www.youtube.com
Adjustment Process
Adjusting LED headlights is crucial for safe driving at night. Proper alignment ensures optimal visibility, reducing glare for oncoming traffic. Follow these simple steps to adjust your car’s LED headlights effectively.
Locate Adjustment Screws
Find the adjustment screws near the headlights. They are usually on the back or side of the headlight assembly. Some cars have two screws for vertical and horizontal adjustments, while others have a single multi-directional screw.
Use a screwdriver to turn these screws. Make sure the car is parked on level ground for accurate alignment. Check your vehicle’s manual if you need help finding the screws.
Adjust Vertical Alignment
The vertical alignment affects how far the light beams reach the road. Incorrect adjustment can cause poor visibility. To adjust, turn the vertical screw slowly.
Shine the headlights on a wall or garage door, about 25 feet away. The beam’s center should be slightly below the headlight height. This prevents blinding oncoming drivers.
Set Horizontal Alignment
Horizontal alignment ensures the light beams are centered. This prevents the light from scattering sideways. Turn the horizontal adjustment screw carefully.
Check the beam pattern on the wall. It should be even on both sides. The beam should not lean left or right excessively. Proper alignment enhances road visibility and safety.
Testing Alignment
Position your car on a level surface facing a wall. Adjust the LED headlights to ensure the beams are evenly aligned and focused. Properly aimed headlights enhance visibility and safety during night driving.
Testing the alignment of your LED headlights is essential for safe night driving. Poorly aimed lights can blind other drivers or limit your visibility. A well-aligned headlight ensures you see the road clearly without causing issues for others. Let’s dive into the steps to test and perfect your headlight alignment.Perform Night Test
A night test is the most effective way to judge your headlight alignment. Find a dark, flat area where you can park your car 25 feet from a wall or garage door. Turn on your headlights and observe the light pattern on the surface. The light beams should be even and not point too high or low. Check if the light is centered and not skewed to one side. If the beams appear off, adjustments are necessary for optimal alignment.Ensure Even Light Distribution
Even light distribution is key to safe driving. Uneven lights can create blind spots and reduce visibility. Stand back and assess if the light spreads evenly across the road. Consider the width and intensity of the light. Is one side brighter than the other? Adjusting the headlights so they distribute light evenly can make a significant difference. Think about your last night drive. Did you notice any areas that were particularly dark or overly bright? Correcting these imbalances will enhance your night driving experience and safety. Remember, proper alignment not only enhances your visibility but also ensures the safety of everyone on the road.Troubleshooting Common Issues
LED headlights are popular for their brightness and energy efficiency. However, they can sometimes have issues. Troubleshooting common problems helps ensure optimal performance. Here are some tips to address these issues effectively.
Dealing With Dim Lights
Dim LED headlights can be frustrating. Start by checking the bulb connections. Loose connections may cause reduced brightness. Ensure the wiring is secure and properly attached. If the problem persists, inspect the bulb itself. A faulty bulb might be the culprit. Replacing it with a new one often solves the issue.
Another factor could be the car’s electrical system. Check for voltage issues. A weak battery or alternator could affect headlight performance. Test the battery and alternator to ensure they are functioning correctly.
Correcting Misalignment
Misaligned headlights can decrease visibility. Start by parking your car on a level surface. Use a wall to measure the alignment. Mark the center point of each headlight on the wall. Adjust the headlights so their beams hit the marked spots.
Locate the adjustment screws on the headlight assembly. Turn them to align the beams properly. Ensure both headlights point slightly downwards. This prevents blinding oncoming traffic. Make small adjustments and test the alignment frequently.
If alignment issues persist, consider professional help. An expert can ensure correct positioning and improve your visibility.
Maintaining Proper Headlight Aim
Proper headlight aim ensures safe night driving. Misaligned headlights can cause glare for other drivers. Regular maintenance keeps your lights functioning efficiently. It enhances visibility and safety on the road.
Regular Inspections
Check your headlight aim frequently. It should be part of routine car maintenance. Look for signs of misalignment. If the light is uneven or too low, adjustments are needed. Use a flat surface to test the alignment. Park your car facing a wall. Measure the distance from the ground to the center of the headlight. Ensure both lights are aligned equally. If unsure, consult a mechanic.
Cleaning Headlight Covers
Dirty headlight covers can reduce visibility. Clean them regularly to prevent dim lighting. Use a soft cloth and mild soap for cleaning. Avoid harsh chemicals that can damage the cover. Rinse with water and dry thoroughly. Check for scratches or damage. Replace covers if they are too worn. Clear covers improve light output and safety.

Credit: www.youtube.com
Frequently Asked Questions
How To Properly Aim Led Headlights?
Park your car 25 feet from a wall. Adjust the LED headlights so the top beam aligns with the center of the headlight and the beam points straight ahead. Ensure both headlights are at the same height for optimal illumination.
Regularly check alignment for safety.
How Should Led Headlight Bulbs Be Positioned?
Position LED headlight bulbs horizontally for optimal light distribution. Align the bulbs to avoid glare. Ensure they fit snugly into the housing. Check beam pattern for correct adjustment. Regularly inspect alignment for safe driving.
How To Tell If Headlights Are Aimed Correctly?
Park your car on level ground, facing a wall. Measure headlight height and mark the wall. Turn on headlights. Light should align with marks and fall slightly below. Adjust beams if necessary. Properly aimed headlights enhance visibility and safety.
What Is The Correct Position Of Led Headlights H11?
Position LED headlights H11 so that the LED chips face 3 o’clock and 9 o’clock. Ensure they are aligned horizontally for optimal light distribution and reduced glare. Adjust the headlights to illuminate the road without blinding oncoming traffic. Proper installation enhances visibility and driving safety.
Conclusion
Aiming LED headlights ensures safer driving at night. Proper alignment prevents blinding oncoming traffic. It also improves road visibility, making night drives stress-free. Anyone can adjust headlights with patience and basic tools. Regular checks help maintain optimal performance. Correctly aimed lights enhance safety for you and others.
So, take time to check your car’s headlights. It’s a simple step for better nighttime driving. A small effort today can save trouble tomorrow. Enjoy the peace of mind while driving with well-adjusted LED headlights. Stay safe on the road!