
Imagine you’re driving down a scenic route, your dash cam capturing every twist and turn. But when you review the footage, the time stamp is all wrong.
Frustrating, isn’t it? Setting the time on your dash cam might seem trivial, but it’s crucial for accurate documentation. Whether you’re dealing with traffic incidents or reliving a memorable drive, having the correct time can make all the difference. In this guide, you’ll learn how to set the time on your dash cam effortlessly.
We’ll simplify the process, so you can have peace of mind knowing your recordings are precise. Dive in to discover the straightforward steps and enjoy your drives with confidence.
Importance Of Correct Time Setting
Setting the correct time on your dash cam might seem like a minor detail, but it holds significant importance. Imagine being involved in a fender bender and finding out your dash cam recorded the incident at a different time. The time stamp on your footage can be crucial for insurance claims and legal matters. It ensures your evidence is accurate and reliable.
Importance Of Accurate Evidence
Accurate time settings play a vital role when using dash cam footage as evidence. If your dash cam displays the wrong time, it could lead to disputes and discrepancies during investigations. Imagine the frustration of proving your innocence only to have your evidence questioned due to incorrect timestamps. Ensuring your dash cam is set to the correct time can help avoid such predicaments.
Facilitating Easier File Organization
Correct time settings also help in organizing your video files efficiently. With accurate timestamps, you can easily search and retrieve footage from specific dates and times without having to sift through countless files. This is particularly useful if you frequently review past recordings or need to locate specific events quickly.
Enhancing Gps Data Accuracy
If your dash cam integrates GPS functionality, accurate time settings can enhance the precision of location data. The GPS data combined with accurate timestamps can provide a comprehensive picture of your driving patterns. It can also aid in tracking mileage and analyzing travel routes effectively.
Improving Overall User Experience
Have you ever tried to sync your dash cam footage with other devices or software? Correct time settings make this process seamless. Whether you’re compiling a road trip video or analyzing driving habits, having synchronized timestamps simplifies these tasks. It enhances your overall experience with the device.
So, how do you ensure your dash cam is always on time? It’s simple yet crucial. Adjust the settings regularly, especially when daylight saving time changes. Take a moment to verify the time whenever you reset or update your device. This small step can save you from potential headaches down the road.

Credit: www.reddit.com
Initial Setup Requirements
Setting the time on your car dash cam is essential. It ensures accurate timestamping of video recordings. This process involves a few initial setup requirements. These steps are simple and straightforward. Follow them to ensure your dash cam is correctly configured.
Gather Necessary Tools
Before starting, gather the tools you need. Usually, you need a power source. This could be your car’s cigarette lighter or USB port. Ensure your dash cam is charged or connected to power. You might also need the user manual. It helps you understand specific instructions for your model.
Check Dash Cam Model
Different dash cams have different setup processes. Check your dash cam model first. Locate the model number on the device or packaging. Visit the manufacturer’s website for model-specific instructions. Knowing your model helps you find the right setup guide.
Accessing Dash Cam Settings
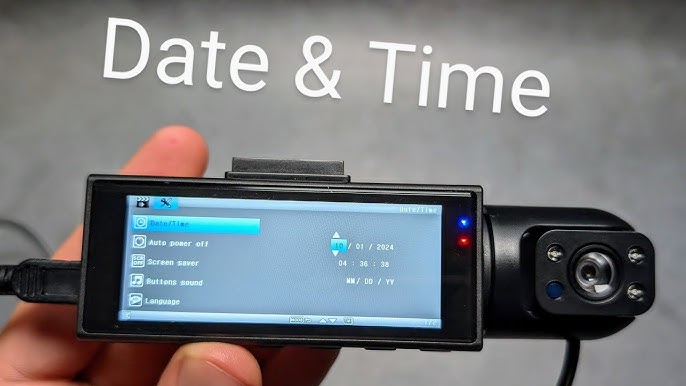
Access dash cam settings through the menu on the device. Find the date and time settings option. Adjust the time using the arrow buttons and save your changes.
Accessing the settings on your dash cam might initially seem like a daunting task, especially if you’re not a tech guru. But fear not, with a little guidance, you’ll soon find it’s as easy as pie. Whether you want to adjust the time or explore other features, accessing the settings is your first step. Imagine driving confidently, knowing that your dash cam is accurately timestamping every second of your journey. It’s all about ensuring that those captured moments are precisely marked, offering peace of mind and reliable evidence if needed.Turn On The Dash Cam
First things first, ensure your dash cam is powered up. Most dash cams automatically switch on when you start your car. However, if yours doesn’t, a simple press of the power button should do the trick. Once it’s on, take a moment to familiarize yourself with the device. Look for any indicator lights or sounds that confirm it’s operational. If the dash cam is part of your daily routine, you might already know these cues by heart.Navigate To Settings Menu
Once your dash cam is powered on, it’s time to dive into the settings. Look for a menu button, which is often located on the dash cam itself or on a connected device like your smartphone. The settings menu is typically represented by a gear icon. Tap or click on it to open up a world of customization options. Inside, you’ll find various settings you can adjust. Look for ‘Time and Date’ to start configuring the time settings. As you navigate through the menu, consider what other settings you might want to tweak. Is your camera angle optimal? Are the video resolution settings suitable for your needs? Remember, exploring these settings not only helps with setting the time but also ensures your dash cam is tailored to your driving experience.Adjusting Date And Time
Setting the time on your car’s dash cam involves accessing the device’s menu. Locate the settings option, then find the date and time section. Adjust the details using the provided buttons or touchscreen interface.
Adjusting the date and time on your dash cam is more than just a minor setup task; it’s essential for accurate event logging. A dash cam’s timestamp can be crucial evidence during an unexpected road incident. Imagine reviewing footage only to find the wrong date and time. Frustrating, right? Let’s ensure your dash cam is set correctly so you can rely on it when needed.Select Date And Time Option
First, turn on your dash cam and navigate to the settings menu. This is typically represented by a gear icon. Once in the settings, look for the option labeled “Date and Time.” This might be bundled under ‘General Settings’ or ‘System Settings.’ Selecting this option will open a new menu specifically for adjusting time-related settings. It’s a good idea to consult your dash cam’s manual if you’re having trouble locating this option. User interfaces can vary significantly between models.Use Controls To Set Time
Once you’re in the Date and Time menu, use the provided controls to adjust the settings. This usually involves using directional buttons to increase or decrease numbers for hours, minutes, days, and months. Ensure you’re setting the time in the correct format—either 12-hour or 24-hour, as per your preference. Some dash cams automatically adjust for daylight saving time, but if yours doesn’t, make sure to account for it manually. After setting the correct date and time, save your changes. A confirmation message or a return to the main menu typically indicates a successful update. Double-check your settings to ensure accuracy. Have you ever thought about how much we depend on these tiny gadgets for our safety? Adjusting the time may seem trivial, but it could make a huge difference when it matters most.Synchronizing With Gps
Synchronizing a dash cam with GPS helps set the correct time automatically. Connect your dash cam to GPS and ensure it has a strong signal. The device will adjust the time settings based on your location, enhancing accuracy and convenience.
Synchronizing your dash cam with GPS ensures accurate time settings. The GPS function in dash cams not only logs your location but also helps adjust time automatically. This feature enhances the reliability of your recordings, providing precise timestamps for every event.Enable Gps Functionality
To begin, ensure your dash cam’s GPS is active. Most dash cams have a built-in GPS module or an external GPS antenna. Check your device’s settings menu. Look for a GPS option and switch it on. This allows the dash cam to connect with satellites. A strong GPS signal is crucial for accurate time synchronization. Position the GPS antenna, if external, where it has a clear view of the sky. This helps maintain a strong signal and reliable data.Automatic Time Adjustment
Once GPS is enabled, your dash cam can adjust time automatically. It uses satellite data to set the correct time and date. This feature eliminates manual time-setting errors. Ensure your dash cam is connected to a power source. It needs power to maintain constant GPS connectivity. Wait a few minutes for the dash cam to sync with GPS. You should see the correct time displayed on the screen. This automatic adjustment keeps your recordings accurate and dependable.Troubleshooting Common Issues
Setting the time on a dash cam involves accessing the device menu. Locate the time settings option and adjust using the available buttons. Confirm the changes to ensure accurate recording timestamps.
Setting the correct time on your dash cam is important. It ensures accurate timestamps on your recordings. But sometimes, issues can arise that prevent your dash cam from displaying the correct time. Let’s explore some common problems and solutions.Incorrect Time Display
An incorrect time display is a common issue with dash cams. It can result from several factors. One reason might be a drained battery. Dash cams often rely on their internal battery to keep time settings. If the battery is low, the time may reset. Check the battery and charge it fully. Another reason could be a manual error. Double-check the settings you entered. Ensure you selected the right time zone. Also, check if the daylight saving time setting is active. These small settings can affect the time display.Gps Signal Problems
GPS signal problems can also cause time issues. Many dash cams use GPS to automatically update the time. If the GPS signal is weak, the time won’t update correctly. Ensure your dash cam has a clear view of the sky. This helps it receive a strong GPS signal. Sometimes, interference from other devices can block GPS signals. Remove any electronic devices near the dash cam. This can help improve signal strength. If your dash cam still has problems, consider resetting the GPS module. This can resolve persistent signal issues. These solutions should help you resolve common time-setting problems. Make sure to regularly check your dash cam’s settings. This ensures it functions correctly and provides accurate recordings.Maintaining Accurate Time Settings
Setting the correct time on your dash cam enhances video reliability. Navigate the dash cam menu to locate the time settings. Adjust the date and time using the provided buttons or touchscreen options.
Maintaining accurate time settings on your dash cam is crucial. It ensures your footage aligns with real-world events. This can be vital for evidence in an incident. Keeping the time accurate helps you track your journeys better. Here’s how to maintain those settings effectively.Regularly Check Settings
Dash cams might reset time after a power loss. Regularly verify the time settings. This ensures they remain correct. Adjust them if needed. This simple task keeps your recordings reliable. A quick check can save you from future issues. Consistent time checks are a good habit.Update Firmware
Firmware updates often fix bugs, including time-related ones. Check if your dash cam has new updates. Manufacturers release these updates to improve performance. Updating firmware can also bring new features. Always read the update notes for details. Following these steps keeps your device functioning well.
Credit: www.tiktok.com

Credit: www.reddit.com
Frequently Asked Questions
How Do I Change The Time On My Dash Cam?
To change the time on your dash cam, access the settings menu. Look for “Date & Time” or a similar option. Adjust the time according to your time zone. Save the changes before exiting the menu. Refer to your dash cam’s user manual for specific instructions.
Why Is The Time On My Dash Cam Wrong?
The time on your dash cam may be wrong due to incorrect initial setup or time zone settings. Battery issues or software glitches could also cause discrepancies. Regularly check and update the time settings to ensure accurate time stamps on recorded footage.
Can A Dash Cam Auto-update The Time?
Some dash cams auto-update the time using GPS signals. This ensures accurate time settings without manual adjustments. However, not all models support this feature. Check your dash cam’s specifications to see if automatic time updates are available. Regularly verify the time accuracy to ensure reliable recordings.
How Often Should I Update Dash Cam Time?
You should update your dash cam’s time whenever you notice discrepancies. Regular updates ensure accurate time stamps, especially after time zone changes. At least, check and update it during daylight saving time changes or after software updates. Consistent time accuracy is crucial for reliable recorded footage.
Conclusion
Setting the time on your dash cam is simple. Follow these easy steps. You ensure accurate timestamps on recordings. This helps in reviewing footage later. Remember, correct time settings are crucial. They provide clear evidence if needed. Keep your dash cam updated.
Regular checks prevent time errors. Always refer to your dash cam manual. It guides you through specific instructions. Troubleshooting tips can save time too. With practice, you’ll set the time quickly. Enjoy peace of mind with correctly timed recordings. A well-set dash cam captures your journeys accurately.
Drive safely and record confidently!