
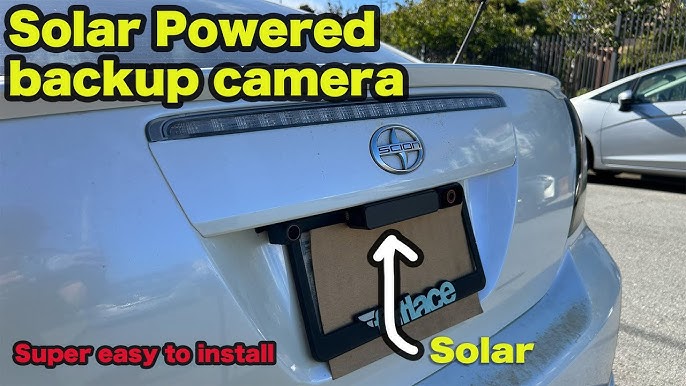
Imagine effortlessly reversing your car without the stress of blind spots or the fear of hitting something out of sight. A wireless backup camera can transform your driving experience, adding a layer of safety and convenience.
You might think installing one sounds complicated, but it’s easier than you might expect. In this guide, you’ll discover a step-by-step process on how to install a wireless backup camera in your car, even if you’re not a tech expert.
By following these simple instructions, you’ll soon enjoy peace of mind every time you shift into reverse. Let’s get started on making your driving safer and more enjoyable.
Choosing The Right Wireless Backup Camera
Choosing the right wireless backup camera for your car is crucial. It ensures a safer and more convenient driving experience. With various options available, making the right choice might seem daunting. Here’s a guide to help you pick the perfect camera for your needs.
Types Of Cameras Available
Wireless backup cameras come in different types. Each offers unique features that cater to specific needs.
- License Plate Cameras:These attach directly to the license plate. They are discreet and easy to install.
- Surface Mounted Cameras:These are mounted on the exterior of the vehicle. They provide a wider view but may require more installation effort.
- Rearview Mirror Cameras:Integrated into the rearview mirror, offering a seamless look and feel.
Factors To Consider
Several factors influence the choice of a wireless backup camera. Consider these points to make an informed decision.
- Resolution:High-resolution cameras provide clearer images. Choose one that offers good picture quality.
- Field of View:A wider field of view captures more area behind the car. Look for cameras with at least 120 degrees of coverage.
- Night Vision:Essential for driving in dark conditions. Ensure the camera has infrared LEDs for better visibility at night.
- Installation Ease:Some cameras are easier to install than others. Check the installation process before purchasing.
- Durability:Choose a camera that withstands various weather conditions. Look for waterproof and dustproof features.
Gathering Necessary Tools
Gather essential tools for installing a wireless backup camera in your car. Get a screwdriver, drill, and electrical tape. Ensure you have the camera kit, including brackets and mounting hardware.
Gathering Necessary Tools Before installing a wireless backup camera in your car, prepare by gathering the necessary tools. Having the right tools ensures a smooth installation process. This preparation can save time and prevent frustration.Essential Tools For Installation
To begin, collect the basic tools required for the installation. These tools will help you securely attach the camera and connect it to your car’s system.- Screwdriver Set:Different screws require different types of screwdrivers. A set with various heads is ideal.
- Wire Stripper:This tool is essential for safely stripping wire insulation.
- Electrical Tape:Use this to insulate and secure wire connections.
- Drill:A cordless drill with drill bits can help with mounting the camera.
- Multimeter:Use it to check voltage and ensure connections are correct.
Optional Accessories
Consider optional accessories to enhance your setup. These items are not mandatory but can improve functionality.- Cable Ties:Useful for organizing and securing loose wires.
- Additional Mounting Brackets:These can provide more options for camera placement.
- Screen Protector:Protects the display unit from scratches and dust.
- Backup Battery:Ensures the camera works even if the car’s power fails.
Preparing Your Car For Installation
Preparing your car for installation is a crucial step in setting up a wireless backup camera. This process ensures that your camera functions optimally and provides clear images. Proper preparation helps avoid any unnecessary hassles during installation. Let’s explore how to get your car ready.
Identifying Suitable Installation Locations
Start by identifying suitable spots for mounting your camera. Consider the rear of your vehicle; it’s typically the best spot. Ensure the location provides a clear, unobstructed view. Check if the spot is near your license plate or trunk handle. These areas usually offer a good field of vision. Avoid areas with excessive vibration or movement. They can affect the camera’s performance.
Cleaning And Prepping The Area
Once you’ve chosen the spot, clean it thoroughly. Use a mild detergent and water to remove dirt and grime. Cleaning ensures the adhesive sticks well. After washing, dry the area completely. Moisture can interfere with the adhesive bond. Inspect the surface for any bumps or uneven spots. Smooth these out to ensure a flat mounting surface.

Credit: www.tiktok.com
Mounting The Camera
Mounting the camera requires choosing a spot near the license plate. Clean the area to ensure proper adhesion. Securely attach the camera using screws or adhesive, ensuring it’s aligned correctly for optimal view.
Mounting the camera in your car is a straightforward process. It ensures you get the best view while reversing. A correctly mounted wireless backup camera enhances safety. Let’s explore how to attach and secure it properly.Attaching The Camera To The License Plate
Most wireless backup cameras attach to the license plate. It’s a convenient location. Begin by removing the license plate screws. Position the camera bracket over the plate. Align the holes with the plate’s holes. Insert and tighten the screws. Ensure they hold the plate and camera securely. Double-check the alignment. The camera should point straight back.Securing The Camera Firmly
A firm attachment is crucial for clear images. Avoid loose camera settings. Tighten all screws using a screwdriver. Check for wobbling or movement. Adjust as needed. Consider using washers for added security. They help prevent loosening over time. Inspect the camera angle. Make adjustments for optimal view. The camera should remain stable during car movements.Connecting The Camera To Power
Connecting your wireless backup camera to power is a crucial step in ensuring it functions properly. The process might seem daunting, but with a bit of guidance, you can confidently navigate the installation. This section breaks down the steps to efficiently power your camera, allowing you to hit the road with peace of mind.
Locating The Power Source
First, identify the ideal power source for your camera. Most drivers choose the reverse light for this purpose. Why? Because the camera should activate when you put your car in reverse. Use a voltage tester to confirm the correct wire. A common tip: look for wires near the tail light assembly.
Alternatively, you can connect to a fuse box for a more permanent solution. Consider how often you’ll use the camera to decide which option suits your needs. Have you ever thought about how a simple choice can impact convenience?
Wiring The Camera
Once you’ve located the power source, it’s time to wire your camera. Begin by stripping the wire ends using wire strippers. This ensures a solid connection. Remember to wear gloves to protect your hands. Safety first!
Next, connect the camera’s power wire to the identified reverse light wire. Secure the connection with electrical tape or wire nuts. Make sure it’s tight enough to withstand vibrations. Have you ever experienced a loose connection causing device failure? It’s frustrating, but avoidable with proper wiring.
Finally, test the connection before finalizing the setup. Activate your car’s reverse gear to see if the camera powers on. If it doesn’t work, double-check your connections. Consider this a learning curve; every setback is a step toward mastering car modifications.

Credit: www.amazon.com
Installing The Monitor
Position the monitor in a visible spot inside the car. Secure it properly to prevent movement while driving. Connect the monitor to the wireless backup camera system, ensuring a clear and stable video feed.
Installing the monitor for your wireless backup camera is a crucial step that transforms your driving experience. It’s all about ensuring you have a clear view of what’s behind you, enhancing safety and convenience. The process is straightforward, but a few thoughtful decisions can make a huge difference in functionality and aesthetics.Choosing The Monitor Location
The first decision is where to place the monitor. The best location is one that offers a clear view without obstructing your line of sight. Many people opt for the dashboard or the windshield. Consider the size of your monitor. A larger screen might provide a better view but could block important parts of your dashboard. Make sure it’s within easy reach to adjust settings without taking your eyes off the road for too long. Try different positions before committing. Use temporary adhesive to test out different spots and drive around a bit. Does it feel natural? Can you glance at it quickly? Your comfort and safety should guide your decision.Connecting The Monitor
Once you’ve chosen the perfect spot, it’s time to connect your monitor. Most wireless systems require minimal wiring, which is a big plus. Typically, you need to connect the monitor to a power source, usually your car’s cigarette lighter or an auxiliary power outlet. Ensure the power cable doesn’t interfere with any vehicle operations or become a distraction. Use cable clips or zip ties to secure loose wires and keep your setup tidy. This not only looks better but also prevents any accidental snags. Finally, pair the monitor with the camera. This might involve pressing a button or navigating a simple menu. Check the instructions specific to your model, as features can vary. Test the connection to ensure you have a clear and stable image. Are you satisfied with the setup? If not, minor adjustments might be necessary to perfect your view.Testing The System
Ensure all components are in place. Position the camera correctly and power it up. Test the screen for a clear view.
Testing the system is crucial after installing a wireless backup camera in your car. This process ensures the camera operates correctly and provides a clear view. Begin by turning on the camera and monitor. Verify that the camera displays images on the screen. Make sure there are no blank or distorted images. Confirm the wireless connection is stable and uninterrupted.Checking Camera Functionality
Examine the camera’s display on the monitor. Ensure the images are clear and sharp. Check if the camera’s night vision feature works properly. Look for any signs of interference or signal loss. Test the camera in various lighting conditions. Verify that the camera switches to night mode when necessary. Assess the responsiveness of the camera’s controls.Adjusting Camera Angles
Adjust the camera’s angle for optimal viewing. Make sure the camera covers the rear area effectively. Use the monitor to check the coverage. Rotate the camera slightly if needed. Check the display after each adjustment. Ensure the camera captures the blind spots. Confirm the camera angle provides a wide view.
Credit: www.youtube.com
Troubleshooting Common Issues
Installing a wireless backup camera in a car involves connecting the camera to the monitor. Ensure all components are compatible and follow the manual instructions. Check power supply connections and adjust camera angles for optimal view.
Installing a wireless backup camera in your car can make parking and reversing much easier. However, like any tech gadget, you might run into some hiccups along the way. Understanding how to troubleshoot common issues can save you a lot of time and frustration. Let’s dive into some of the most frequent problems and how you can address them.Signal Interference Problems
Signal interference is a common hurdle with wireless backup cameras. This can result in a choppy or unstable video feed. If you’re experiencing these issues, consider the following solutions: – Check for Obstructions: Make sure there are no large metal objects between the camera and the receiver. Such objects can block or distort the signal. – Frequency Adjustment: Some cameras allow you to switch frequencies. Try adjusting the frequency to see if it improves the connection. – Position Adjustment: Sometimes, simply changing the position of the receiver can make a significant difference. Experiment with different locations to find the sweet spot for a stable connection. – Interference from Other Devices: Other wireless devices like Bluetooth speakers or Wi-Fi routers can cause interference. Try moving these devices away from your car. Have you ever noticed how your Wi-Fi slows down when too many devices are connected? The same principle applies here.Power Connection Issues
A reliable power connection is crucial for your camera to function properly. If your camera isn’t turning on, it’s time to look at the power supply. – Check the Connection: Ensure that all cables are securely connected. A loose wire can prevent the camera from receiving power. – Test the Voltage: Use a multimeter to check if the correct voltage is reaching the camera. If not, you might need to replace the power source. – Inspect the Fuse: A blown fuse can cut off power to the camera. Check your car’s fuse box and replace any blown fuses. – Battery Health: If your camera is battery-powered, ensure the batteries are charged and in good condition. Have you ever found your phone dying unexpectedly because of a loose charger? It’s frustrating, right? The same could be happening with your camera if power issues aren’t addressed. By tackling these common issues head-on, you can enjoy the convenience of your wireless backup camera without unnecessary headaches. Remember, a little troubleshooting goes a long way in ensuring a smooth and safe driving experience.Maintenance Tips
Installing a wireless backup camera can enhance safety while driving. Start by choosing the right camera for your car model. Follow the manufacturer’s instructions for mounting and connecting the camera. Ensure all components are securely attached for optimal performance and reliability.
Installing a wireless backup camera in your car can significantly enhance your driving experience, offering added safety and convenience. However, like any technology, it requires regular upkeep to function smoothly. Proper maintenance ensures your camera remains in optimal condition, providing you with a reliable view of what’s behind your vehicle. Below are some essential maintenance tips to keep your wireless backup camera in top shape.Regular Cleaning
Keeping the camera lens clean is crucial for clear visibility. Dirt, dust, and grime can accumulate on the lens, obstructing your view and potentially leading to mishaps. Use a soft microfiber cloth to gently wipe the lens, ensuring not to scratch it. A mild glass cleaner can be used for stubborn spots, but ensure it’s safe for electronic components. Avoid using harsh chemicals, as they can damage the lens or camera housing. Regular cleaning, especially after driving in adverse weather, will ensure your camera always provides a clear view.Periodic System Checks
Conducting routine system checks is vital to verify that your backup camera is functioning correctly. Test the camera regularly by engaging reverse gear and observing the display for any irregularities such as flickering or loss of signal. Check the wireless connections if you notice any issues. Loose connections or interference can disrupt the signal. Make sure the camera’s software is up-to-date if applicable, as updates can fix bugs and improve performance. Are you noticing any lag in the display? It might be time to check the battery if your system is battery-powered, as low power can affect performance. Simple, periodic checks can prevent unexpected failures and keep your camera reliable when you need it most.Frequently Asked Questions
How Do I Connect A Wireless Backup Camera?
To connect a wireless backup camera, start by mounting the camera on your vehicle. Next, install the monitor inside your car. Pair the camera with the monitor using the provided instructions. Ensure both devices are powered and within range for optimal performance.
What Tools Are Needed For Installation?
For installation, you’ll need a screwdriver, drill, and possibly a wrench. Additional tools might include wire strippers, electrical tape, and zip ties. Always refer to the specific installation manual for any additional tools required.
Can I Install A Backup Camera Myself?
Yes, you can install a backup camera yourself with basic tools and instructions. Follow the manufacturer’s guidelines carefully. If unsure, consider professional installation to ensure the system works effectively and safely.
How Long Does Installation Take?
Installation typically takes about 1-2 hours, depending on your experience and vehicle. Following detailed instructions can streamline the process. Prepare all tools in advance for a smoother installation experience.
Conclusion
Installing a wireless backup camera boosts your driving safety. It’s a simple process. First, gather the right tools. Next, carefully follow the instructions. Most systems are user-friendly and come with guides. Ensure the camera is securely mounted. Check the screen for clear visibility.
Test the camera before hitting the road. This ensures everything functions well. A backup camera helps avoid accidents. It makes parking easier too. With patience, anyone can install it. Enjoy safer driving with this handy addition.